

How To Implement A Single Page Modular App Architecture Using Pure HTML, CSS, Javascript


Table of contents
- 🏆 What will you learn in this tutorial?
- 💡 What's New In This Tutorial?
- ⚠ Before You Begin
- 🍽 Step 1 - Project Setup
- 💀 Step 2 - Create The HTML App Skeleton
- ⥣ Step 3 - Setup Routing
- 🍔 Step 4 - Setup Main Menu
- 🔎 Step 5 - Setup Search
- 🦜 Step 6 - Setup Social Media Links
- 🔔 Step 7 - Setup Notifications
- © Step 8 - Copyright Notice
- 🕺 Step 9 - Setup Call To Action Button
- 👨👩 Step 10 - Setup User Profile
- 🔴🟢🔵 Step 11 - Theme The User Interface
- Conclusion
- Resources
🏆 What will you learn in this tutorial?
Single page application fetches and loads the main UI skeleton into the browser only once, during the first fetch. And thereafter, loads the subsequent UI modules dynamically without re-fetching as the user interacts with the app.
Look at the example given below. It is a simple single-page application developed using purely HTML, CSS and Javascript. In this tutorial, you are going to learn how to implement it.
💡 What's New In This Tutorial?
Front-end frameworks such as React, Angular, Vue, etc. exist today that enable the development of single-page applications. But the development of single-page applications using purely HTML, CSS and Javascript is still not very straightforward.
In this tutorial, you will learn about SfNav, a web component, which allows you to architect HTML applications in a modular fashion. It paves the way for developers to choose just HTML, CSS and Javascript for writing complex apps with a scalable, maintainable and testable codebase.
⚠ Before You Begin
The following are the pre-requisites for this tutorial:
Familiarity with Web Development - You need to be familiar with the basic concepts of HTML, CSS & Javascript. You need not be an expert developer, but basic knowledge is necessary. W3 Schools Roadmap could be a good starting point for this.
NPM Installation - In this example, we will use an NPM-based web server. So to follow this tutorial properly, I will recommend that you have npm installed on your development machine. Once you get the hang of it, you can also try the same method on other web servers, no problem!
Editor - You will also need a good web editor. I like VS Code. You can use any editor of your choice.
🍽 Step 1 - Project Setup
1.1 Project Directory
Create a new folder on your machine for this task. I called it SfNav-Demo. You can name it as you want.
1.2 Initialize NPM
npm init
Just accept the default values, and keep pressing ENTER until the initialization completes and the package.json file is generated. Your project will now have only one file, namely package.json.
1.2 Create the dist/ folder
Create a folder to store all the html files. I called it "dist/".
1.3 Install the HTTP-server packages
npm install connect serve-static
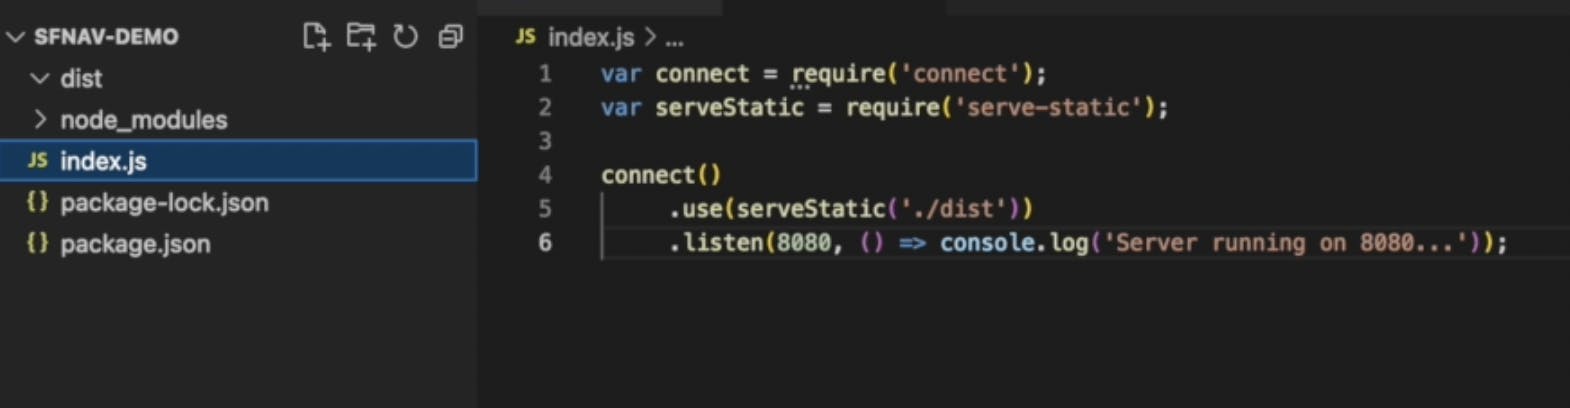
1.4 Create index.js
Create index.js, to hold the code for the HTTP-server. Paste the code given below in index.js.
var connect = require('connect');
var serveStatic = require('serve-static');

connect()
     .use(serveStatic('./dist'))
     .listen(8080, () => console.log('Server running on 8080...'));
Your folder structure should look like this:
1.5 Start the HTTP-server
Start the web server using the below command
node index.js
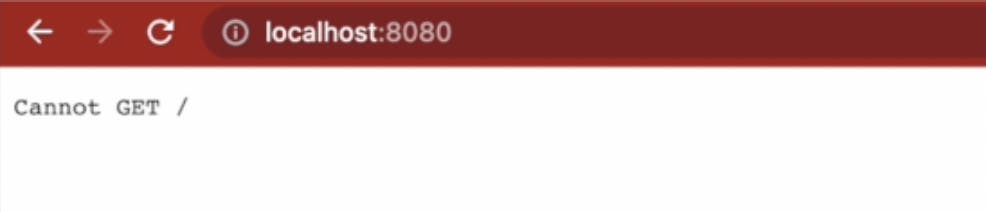
Browse to localhost:8080 for confirming that the web server is running. A running server will throw an error message similar to the one given below. This is because we haven't yet created index.html in the dist folder.
1.6 Create dist/index.html
Create index.html file in the dist folder and initialize it with the following code:
<html>
hello sfnav
</html>
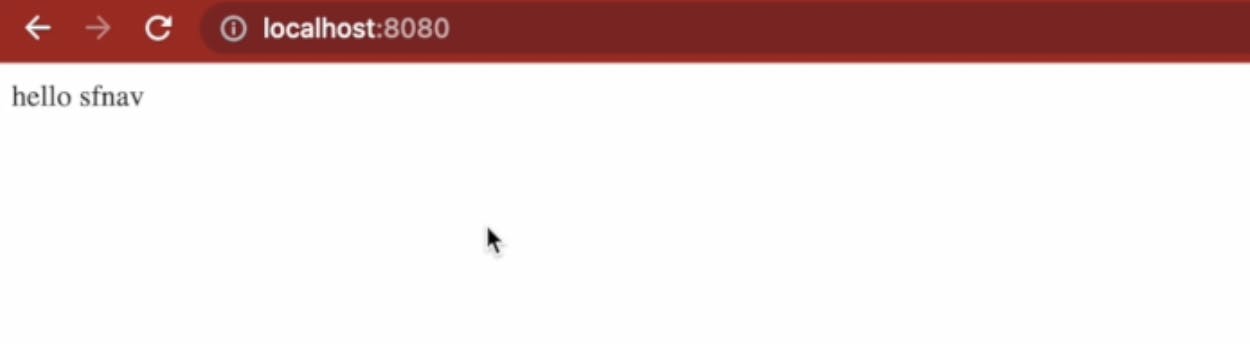
Go back to the browser and refresh it. Confirm that the HTTP-server now serves the index.html page.
At this point, the basic project setup is complete. Let us move on to the next steps.
💀 Step 2 - Create The HTML App Skeleton
The code of the HTML skeleton is given below. Copy and paste it into your dist/index.html.
<!DOCTYPE html>
<html>
<head>
<meta charset="utf-8" />
<meta name="viewport" content="width=device-width, initial-scale=1">
<title><sf-nav> Demo</title>
<!-- Integration material icons as they are used in sf-nav -->
<link href="https://fonts.googleapis.com/icon?family=Material+Icons" rel="stylesheet">
<!-- Google fonts integration -->
<link rel="preconnect" href="https://fonts.googleapis.com">
<link rel="preconnect" href="https://fonts.gstatic.com" crossorigin>
<link href="https://fonts.googleapis.com/css2?family=Source+Sans+Pro:wght@200;300;400;600&display=swap" rel="stylesheet">
<!-- Integration the web components module -->
<script src="https://unpkg.com/@webcomponents/webcomponentsjs@latest/webcomponents-loader.js"></script>
<!-- Integration lit and sf-nav web components module -->
<script type="module">
import {LitElement, html, css} from 'https://unpkg.com/lit-element/lit-element.js?module';
import {SfNav} from 'https://unpkg.com/sf-nav/sf-nav.js?module';
</script>
<style>
body {
background-color: #efefef;
margin: 0px;
font-family: 'Source Sans Pro';
}
sf-nav:not(:defined) {
display: none;
}
</style>
</head>
<body style="margin: 0px;">
<sf-nav>
<!-- Set the brand name -->
<h2 slot="brandName"><a href="#home" >Superflows</a></h2>
<!-- Set the brand logo -->
<a slot="brandImage" href="#home" ><img alt="logo" src="https://superflows-images.s3.ap-south-1.amazonaws.com/superflows_black_transparent_200.png" /></a>
</sf-nav>
</body>
</html>
This skeleton code does the following:
It sets up the viewport
It includes the material icons package, which is required by the SfNav web component
It includes fonts, although you can use any fonts of your choice
It includes the web component loader script
It includes the Lit library. SfNav component depends on Lit, hence this inclusion is necessary
It includes the SfNav web component library
It includes a style block that - (1) Sets some basic styling to the document body and (2) Ensures that the SfNav component will show up only after it is defined properly
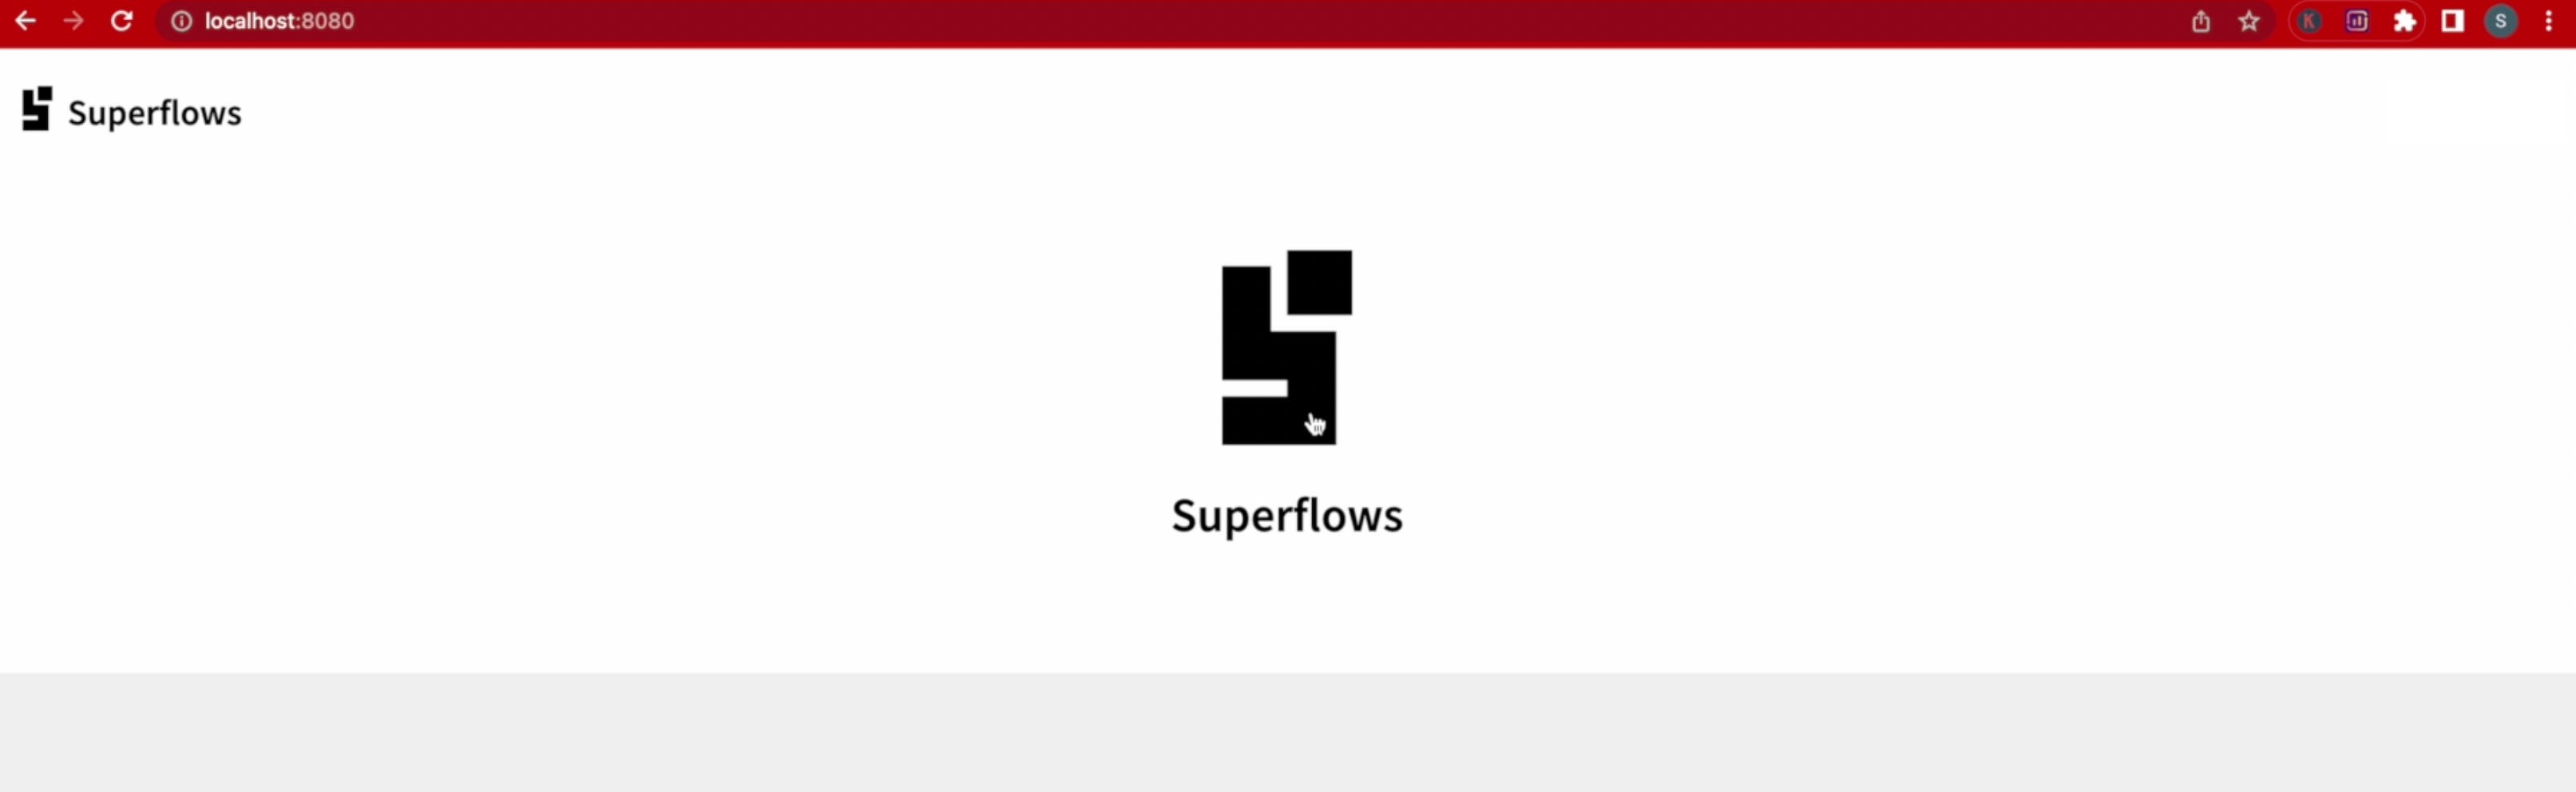
It then includes/renders the SfNav component in the body HTML with a brand name and brand image.
💾 ↺ Save dist/index.html, and reload the browser.
You will see that a bare-bones navigation component has loaded which only contains the brand name and brand image. The point to note is that it contains both the header part and the footer part.
⥣ Step 3 - Setup Routing
3.1 Understanding Links
SfNav recognizes routes that are prefixed with hash. For example, in the file dist/index.html, the brand name and the brand image are linked to #home, which essentially means that the component home.html will be loaded if the user clicks on either of the brand name and the brand image links.
3.2 Setup Route Container
Create a page content slot in the sf-nav block as shown below. This container sits between the header and footer and dynamically displays the page content as the user navigates across pages.
<sf-nav>

        <!-- Set the brand name -->
        <h2 slot="brandName"><a href="#home" >Superflows</a></h2>
        <!-- Set the brand logo -->
        <a slot="brandImage" href="#home" ><img alt="logo" src="https://superflows-images.s3.ap-south-1.amazonaws.com/superflows_black_transparent_200.png" /></a>

        <!-- Page Content -->
        <div slot="content">
        </div>

</sf-nav>
3.3 Setup Parameter Passing
To enable parameter pass-down during routing, include the following Javascript code block in the sf-nav block. This code block:
Listens to the routeChange event from SfNav and updates the routeMap associative array with the new route and its parameters, every time the routeChange event is fired.
Exposes two functions - (1) getCurrentPathname and (2) getCurrentArgs, which can be used to obtain the current location and the current parameters.
<body>
    <sf-nav>
<!-- Set the brand name -->
        <h2 slot="brandName"><a href="#home" >Superflows</a></h2>
        <!-- Set the brand logo -->
        <a slot="brandImage" href="#home" ><img alt="logo" src="https://superflows-images.s3.ap-south-1.amazonaws.com/superflows_black_transparent_200.png" /></a>
        <!-- Page Content -->
        <div slot="content">
        </div>
    </sf-nav>

    <script>
        var routeMap = [];

        function getCurrentPathName() {
          return window.location.hash.length === 0 ? '' : window.location.hash.split("/")[0].replace('#', '');
        }
        function getCurrentArgs() {
          return routeMap[getCurrentPathName() + '.html'];
        }

        document.getElementsByTagName('sf-nav')[0].addEventListener('routeChange', (e) => {
          routeMap[e.detail.pathName] = e.detail.args;
        })
    </script>

</body>
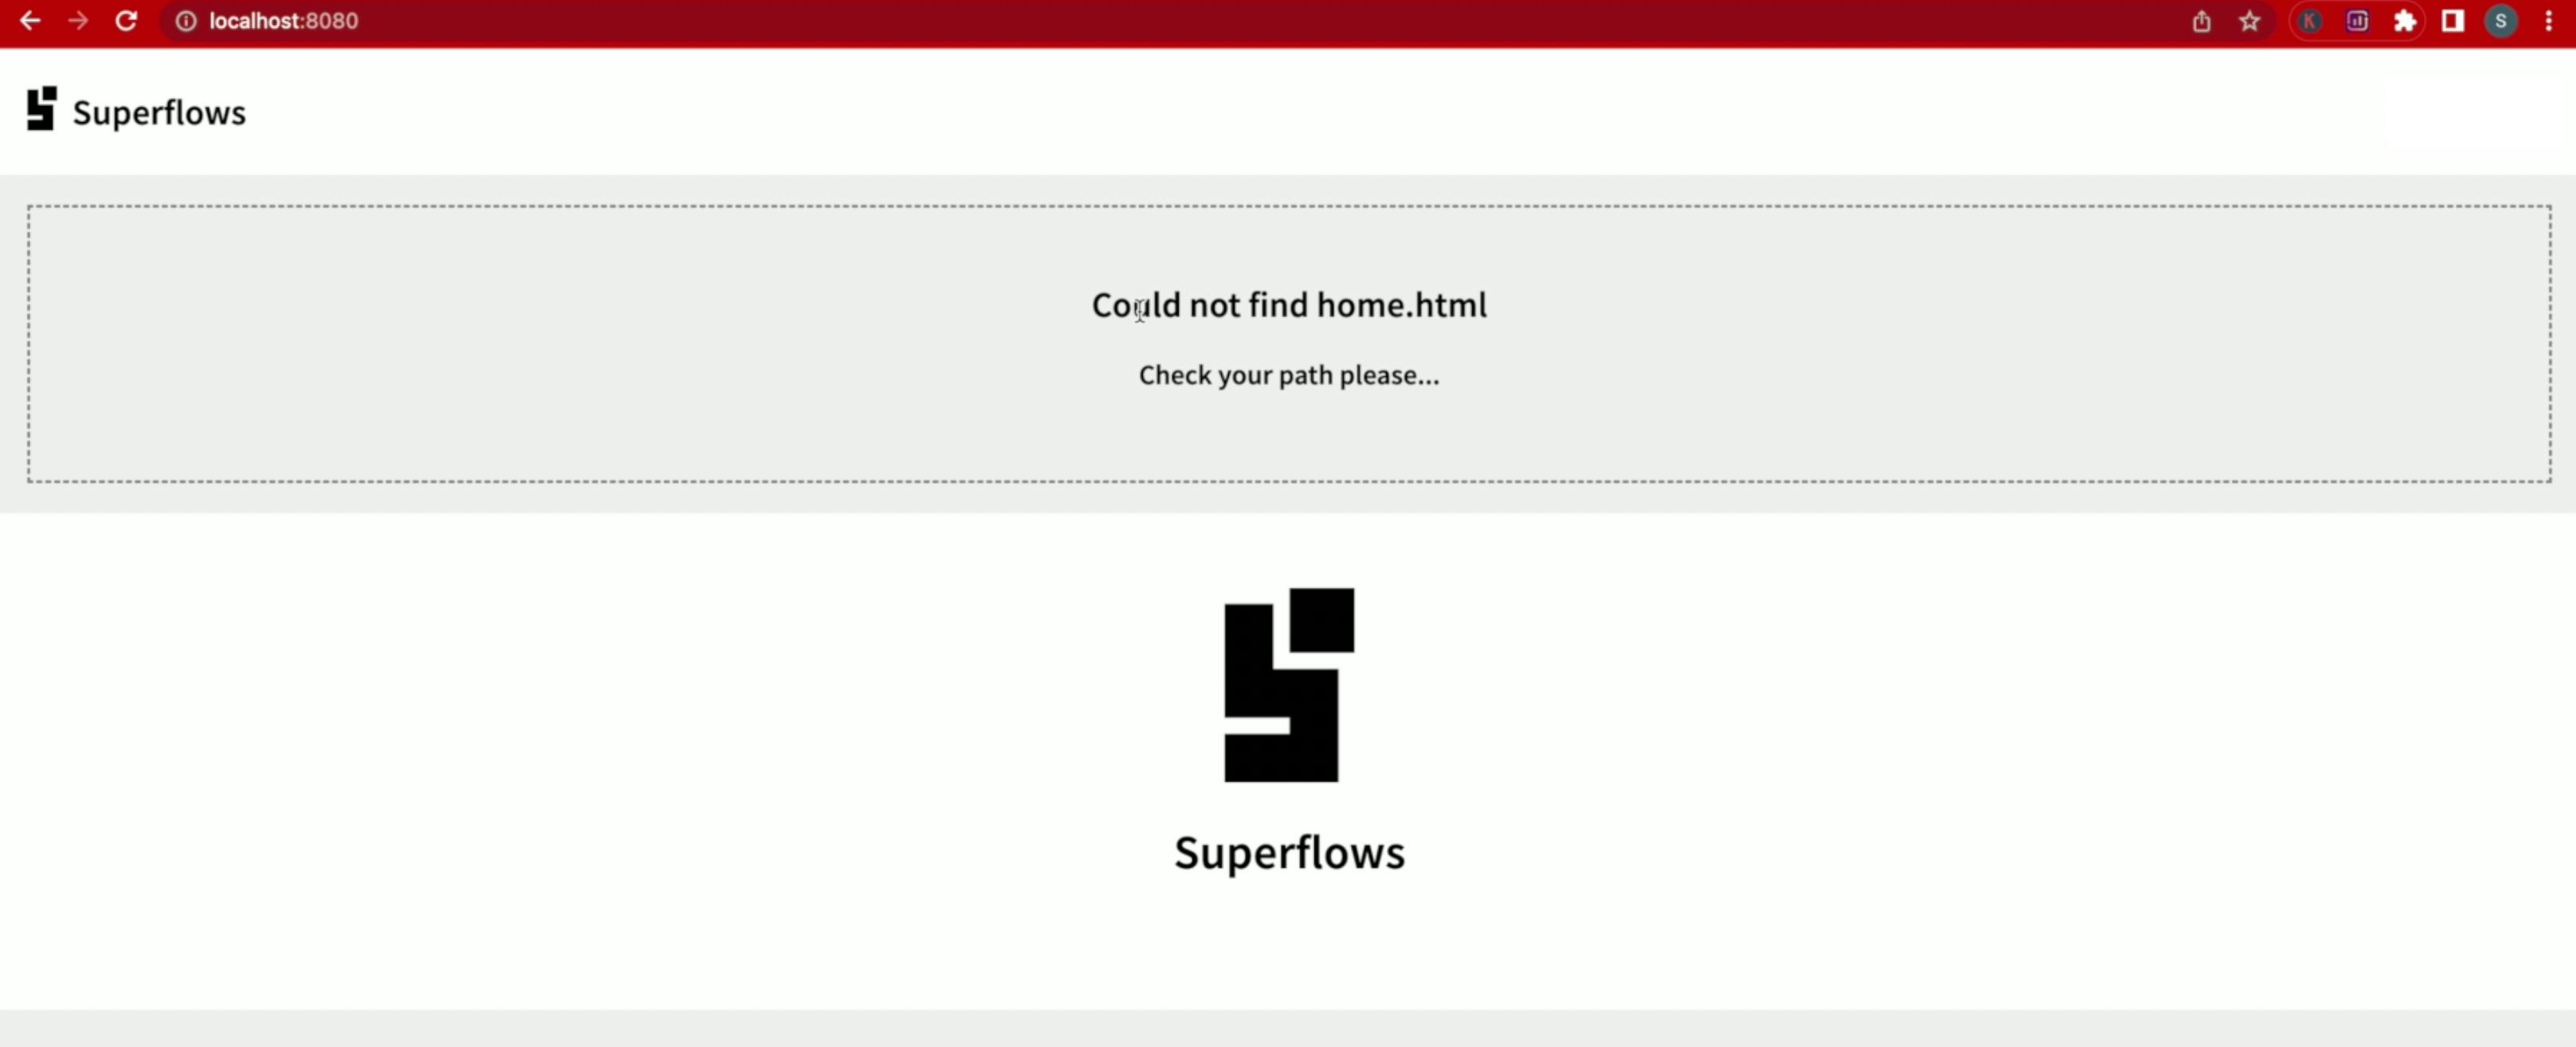
3.4 Confirm That Routing Works
At this point, the routing configuration is complete.
💾 ↺ Save dist/index.html, and reload the browser.
You will observe the following:
The header and the Footer are now separated with a content block in between.
SfNav now throws the 'Could not find home.html' message. Don't worry, this is perfectly fine because we haven't yet created the home.html file.
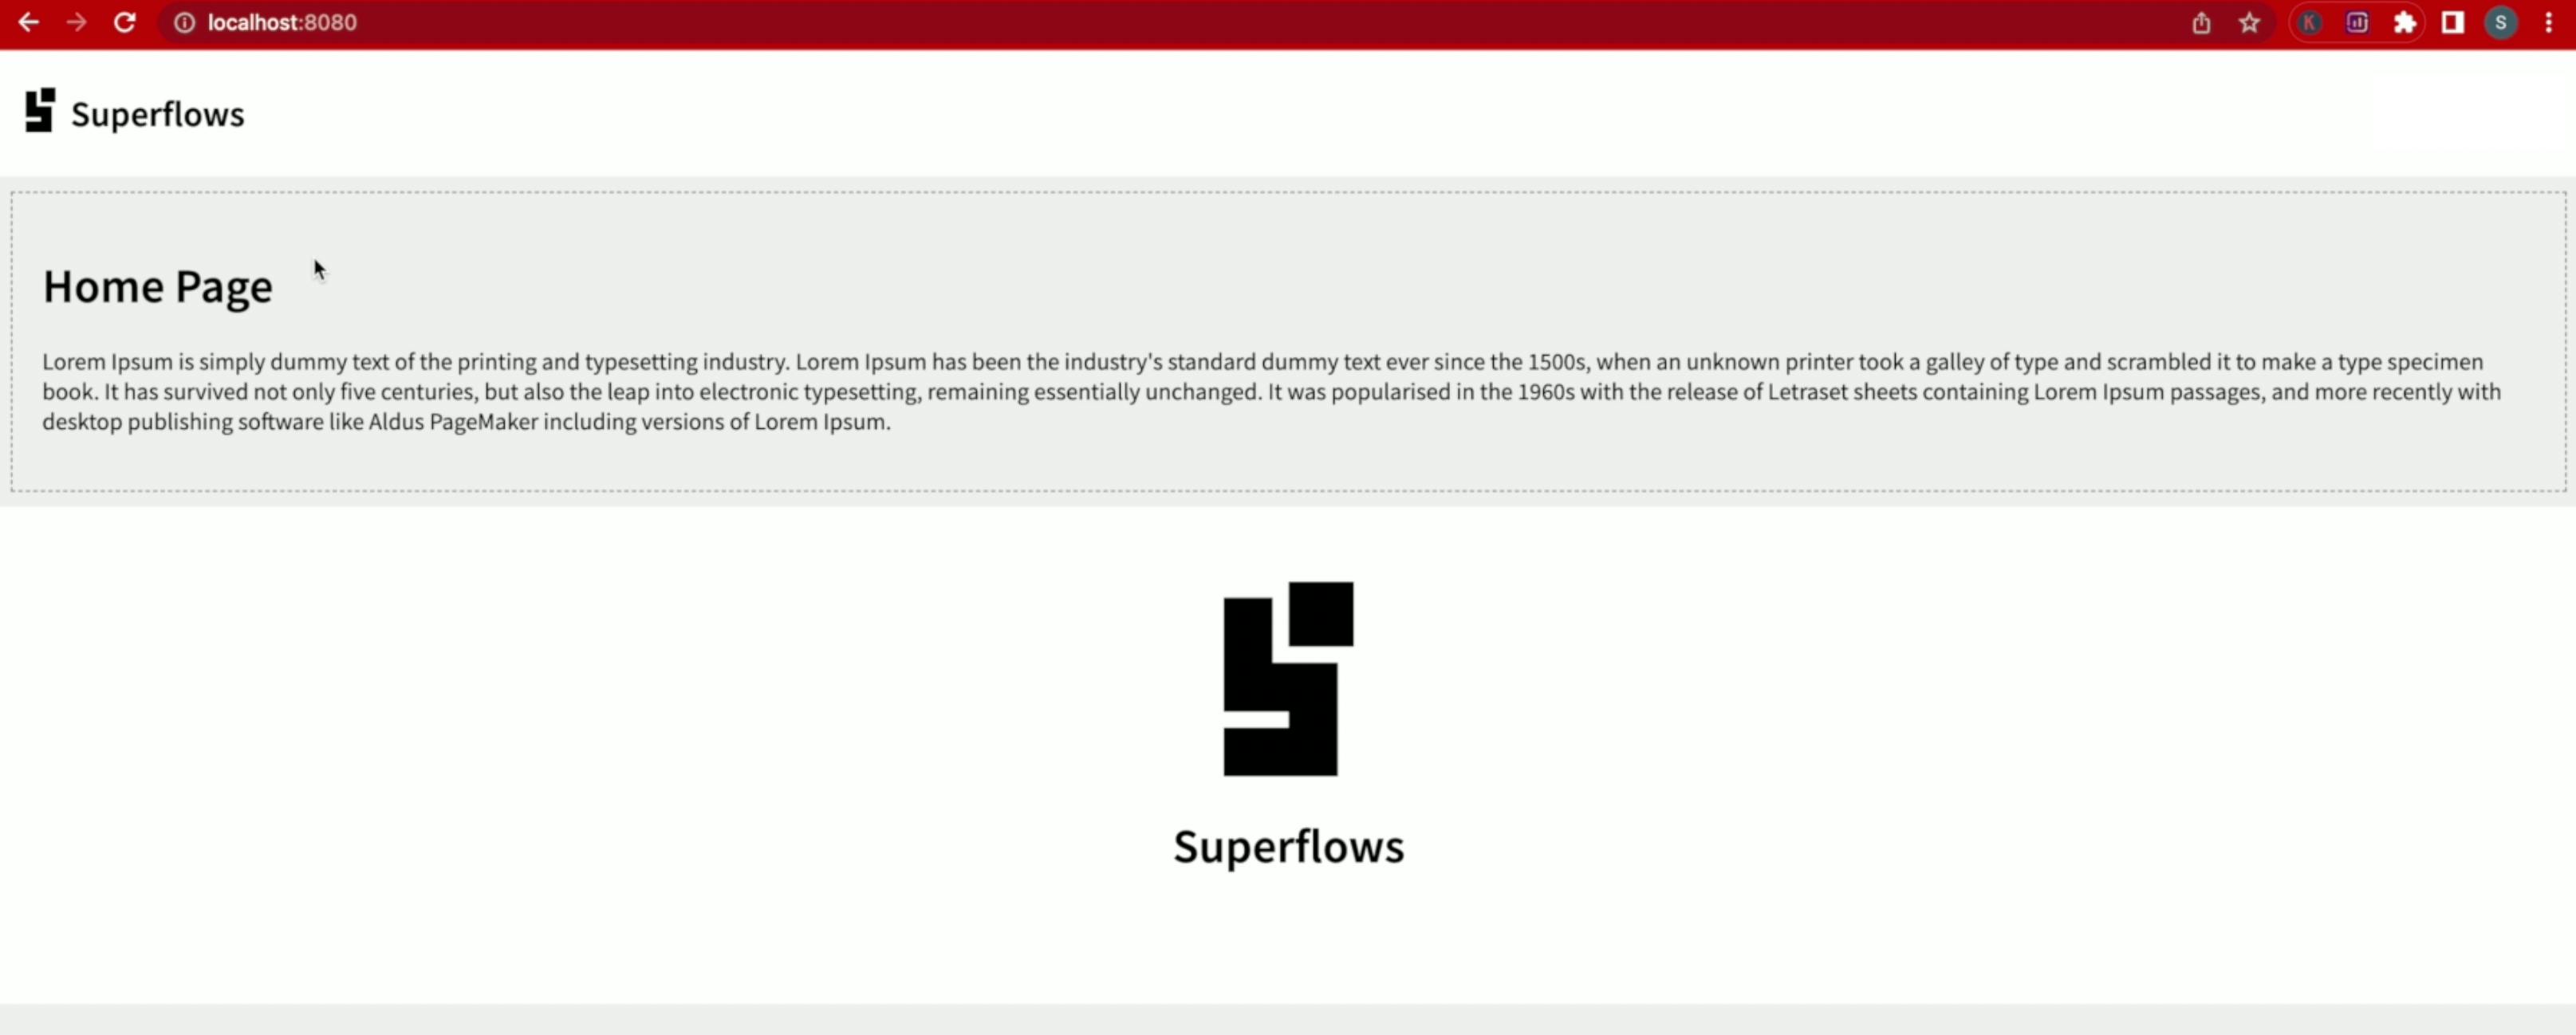
3.5 Create dist/home.html
Create a new file dist/home.html with the below HTML:
<div class="cContainer">
    <h1>Home Page</h1>
    <p>Lorem Ipsum is simply dummy text of the printing and typesetting industry. Lorem Ipsum has been the industry's standard dummy text ever since the 1500s, when an unknown printer took a galley of type and scrambled it to make a type specimen book. It has survived not only five centuries, but also the leap into electronic typesetting, remaining essentially unchanged. It was popularised in the 1960s with the release of Letraset sheets containing Lorem Ipsum passages, and more recently with desktop publishing software like Aldus PageMaker including versions of Lorem Ipsum.</p>
</div>
💾 ↺ Save dist/home.html, and reload the browser.
The home page content will now load.

You will observe that the content loads properly. Let us style it a bit, so that it looks a bit nicer. Add the following styles in the style block of dist/index.html:
<head>
    <style>
        <!-- other styles -->

        .cContainer {
            margin: 10px;
            padding: 20px;
            border: dash 1px gray;
        }
    </style>
</head>
💾 ↺ Save dist/index.html, and reload the browser.
This looks good for now. We can surmise now that routing is working normally. Let us move ahead.
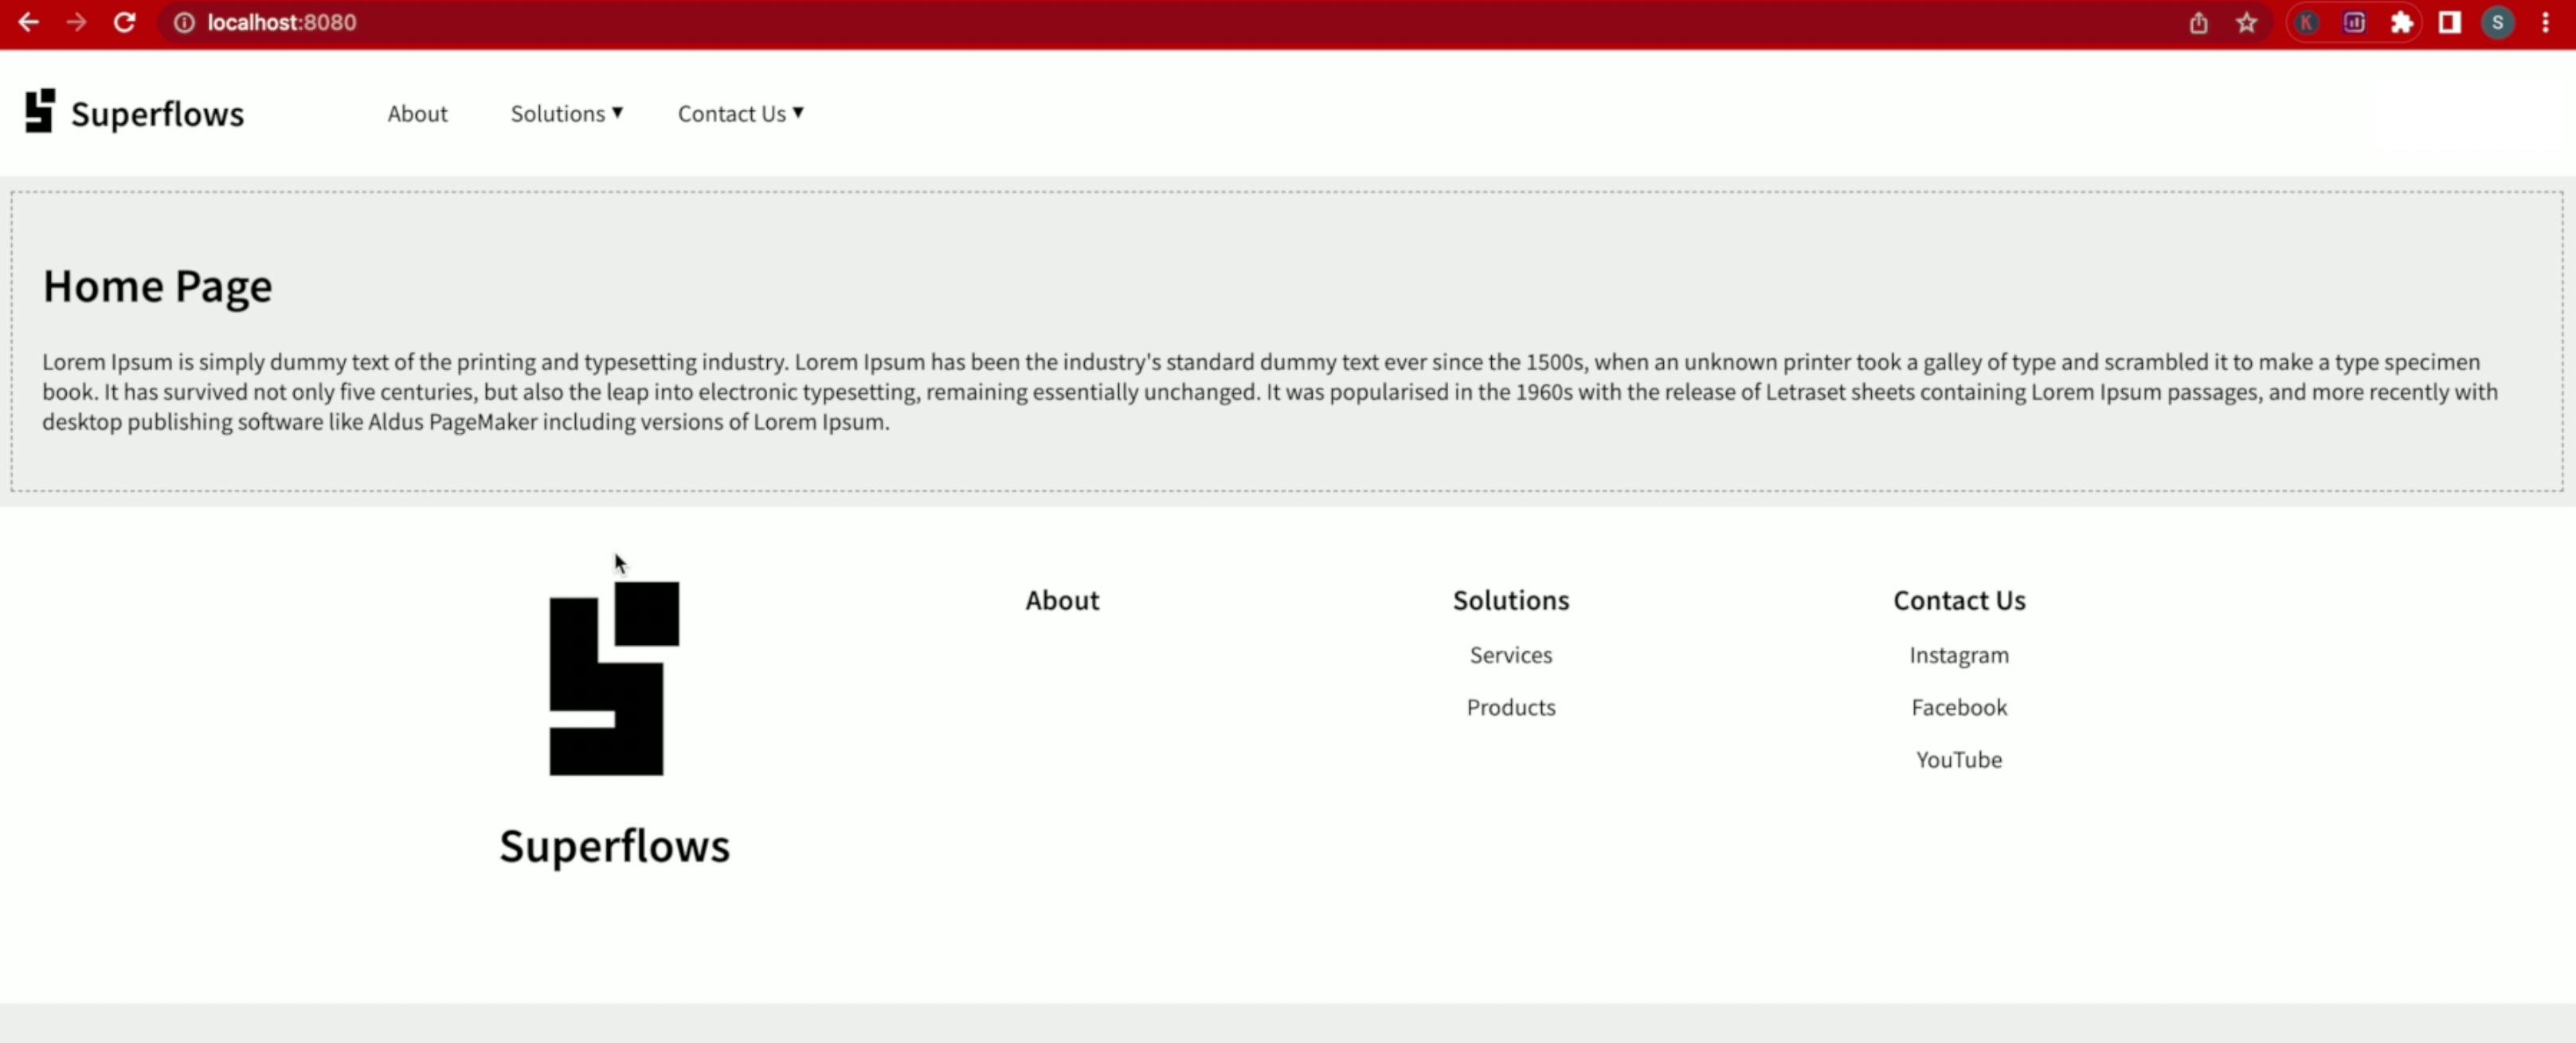
🍔 Step 4 - Setup Main Menu
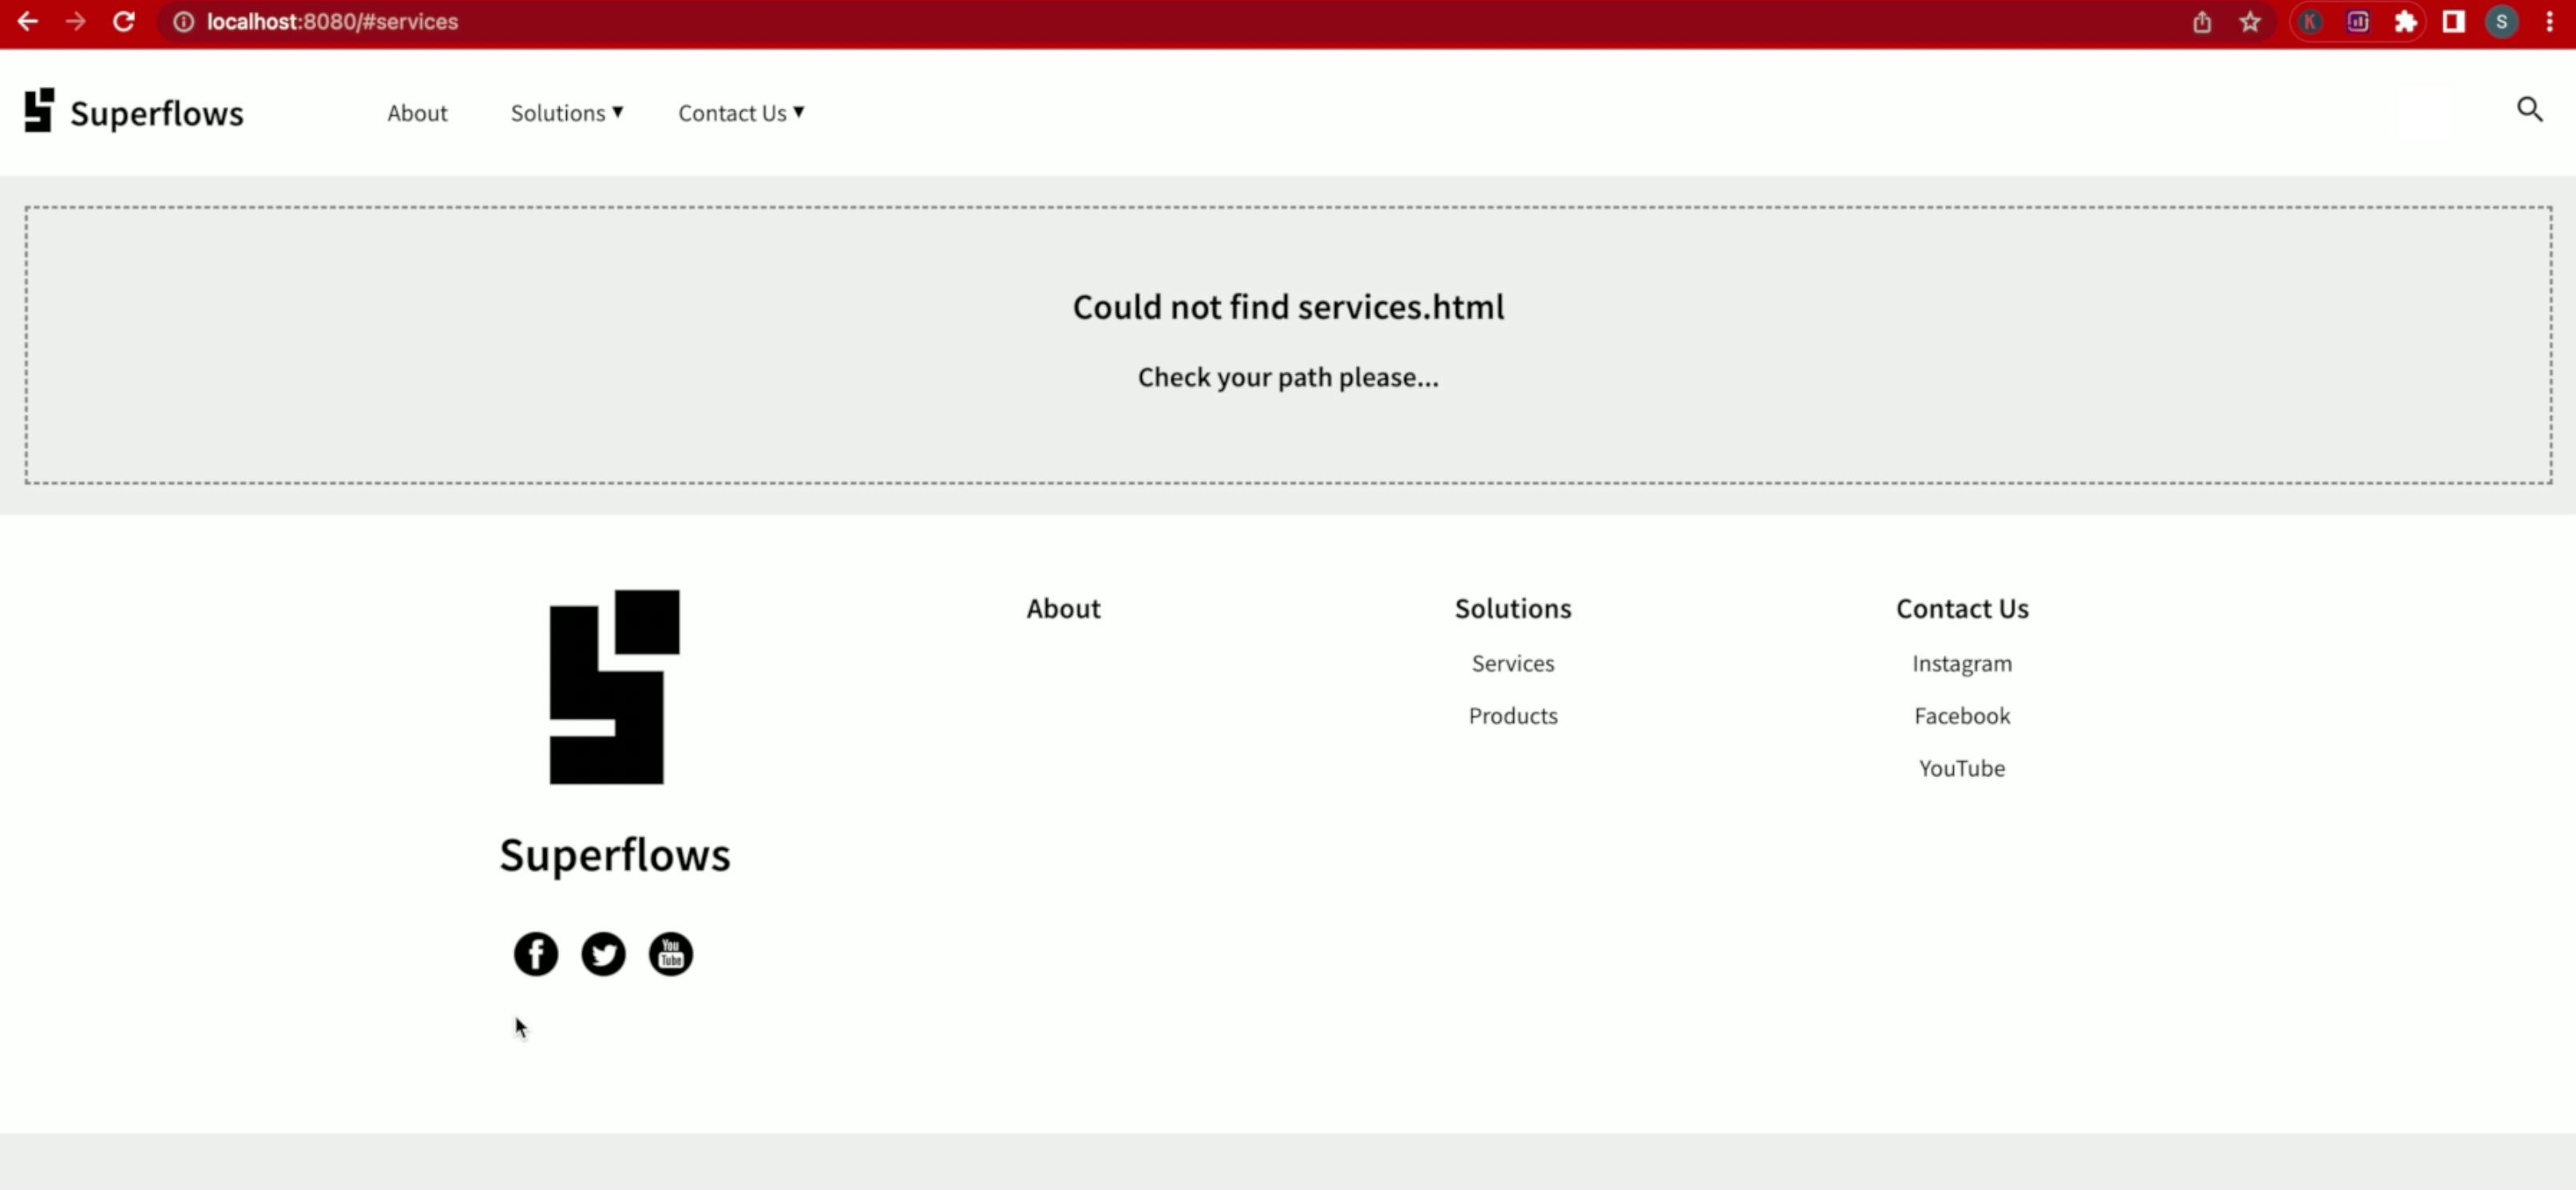
SfNav supports two-level menus. Creating it is pretty straightforward. Create an unordered list as shown below and set it to the main menu slot. Some menu items point to internal links (links with hash) and some menu items point to external links (links with http(s)).
<body>
    <sf-nav>
        <!-- Set the main menu -->
        <ul slot="mainMenu">
            <li><a href="#about">About</a></li>
            <li class="li-solutions">
                <a href="javascript:void(0);" class="a-solutions">Solutions</a>
                <ul>
                    <li><a href="#services">Services</a></li>
                    <li><a href="#products">Products</a></li>
                </ul>
            </li>
            <li>
                <a href="javascript:void(0);">Contact Us</a>
                <ul>
                    <li><a href="https://instagram.com">Instagram</a></li>
                    <li><a href="https://facebook.com">Facebook</a></li>
                    <li><a href="https://youtube.com">YouTube</a></li>
                </ul>
            </li>
        </ul>
    </sf-nav>
</body>
💾 ↺ Save dist/index.html, and reload the browser.
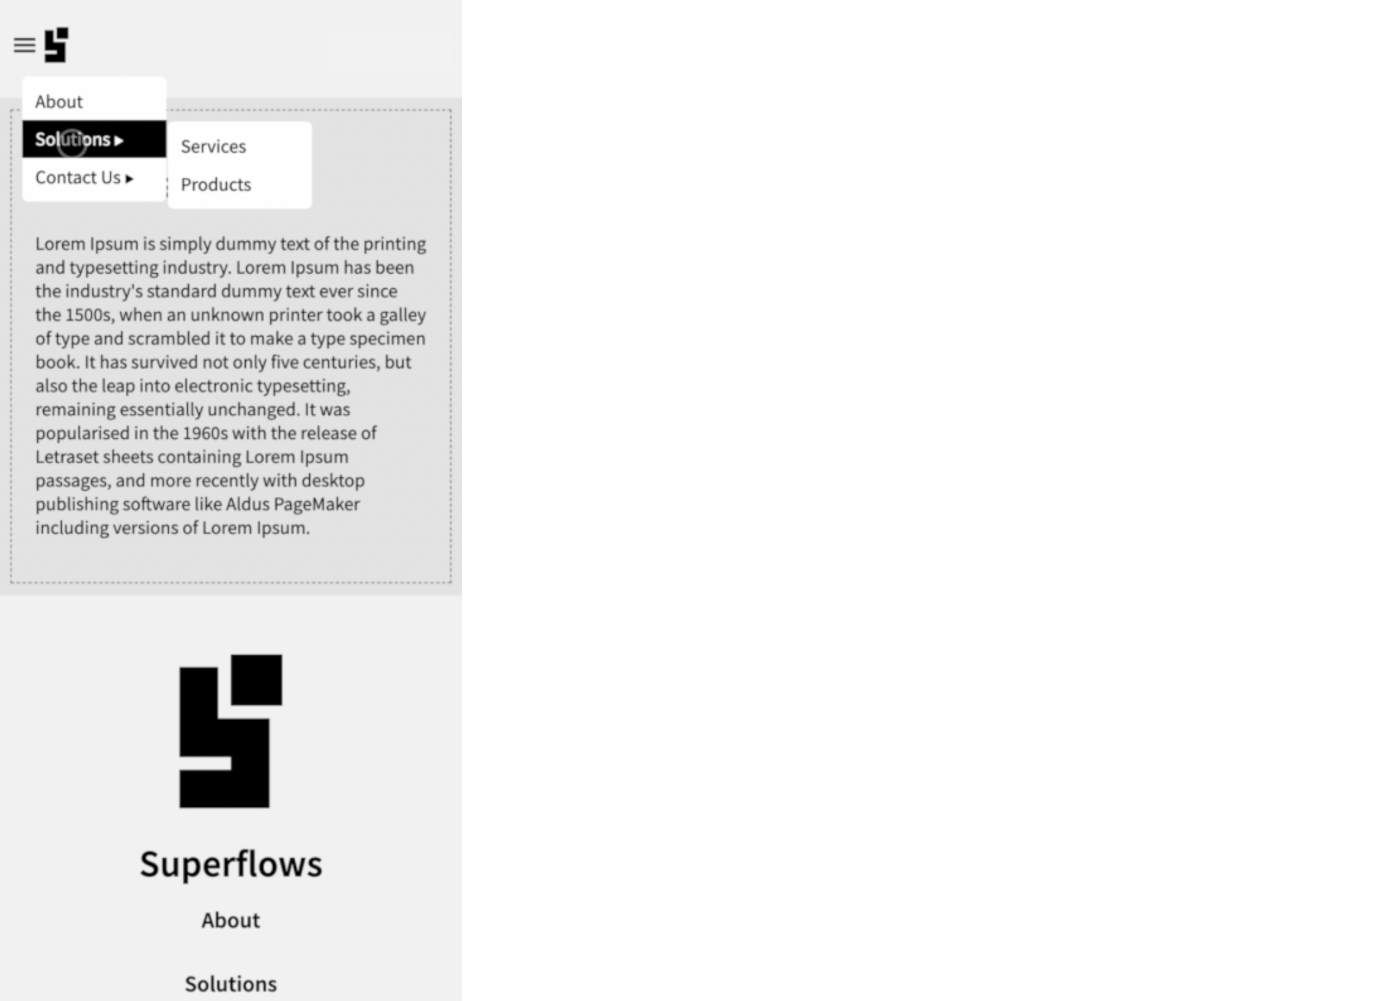
If you click on any menu items with internal links such as services, products, you will observe that SfNav throws the file not found message. This is because we haven't yet created these files.
📝 Quick Task
Go ahead and create services.html and products.html with any content of your choice and observe how it is rendered. Drop your observations in the comments section!
🔎 Step 5 - Setup Search
Search functionality is available by default. Just subscribe to the searchClick event to capture the event when the user types something in the search box and presses Enter.
<script>
document.getElementsByTagName('sf-nav')[0].addEventListener('searchClick', (e) => {console.log('search clicked ' + JSON.stringify(e.detail));})
</script>
🦜 Step 6 - Setup Social Media Links
Social media links can be configured using an unordered list as well. Below is an example:
<body>
    <sf-nav>

        <!-- Set the social media links -->
        <ul slot="socialMedia">
            <li><a href="https://facebook.com"><img src="https://superflows-images.s3.ap-south-1.amazonaws.com/facebook-black_round.png" /></a></li>
            <li><a href="https://twitter.com"><img src="https://superflows-images.s3.ap-south-1.amazonaws.com/twitter_black_round.png" /></a></li>
            <li><a href="https://youtube.com"><img src="https://superflows-images.s3.ap-south-1.amazonaws.com/youtube_black_round.png" /></a></li>
        </ul>

    </sf-nav>
</body>
💾 ↺ Save dist/index.html, and reload the browser.
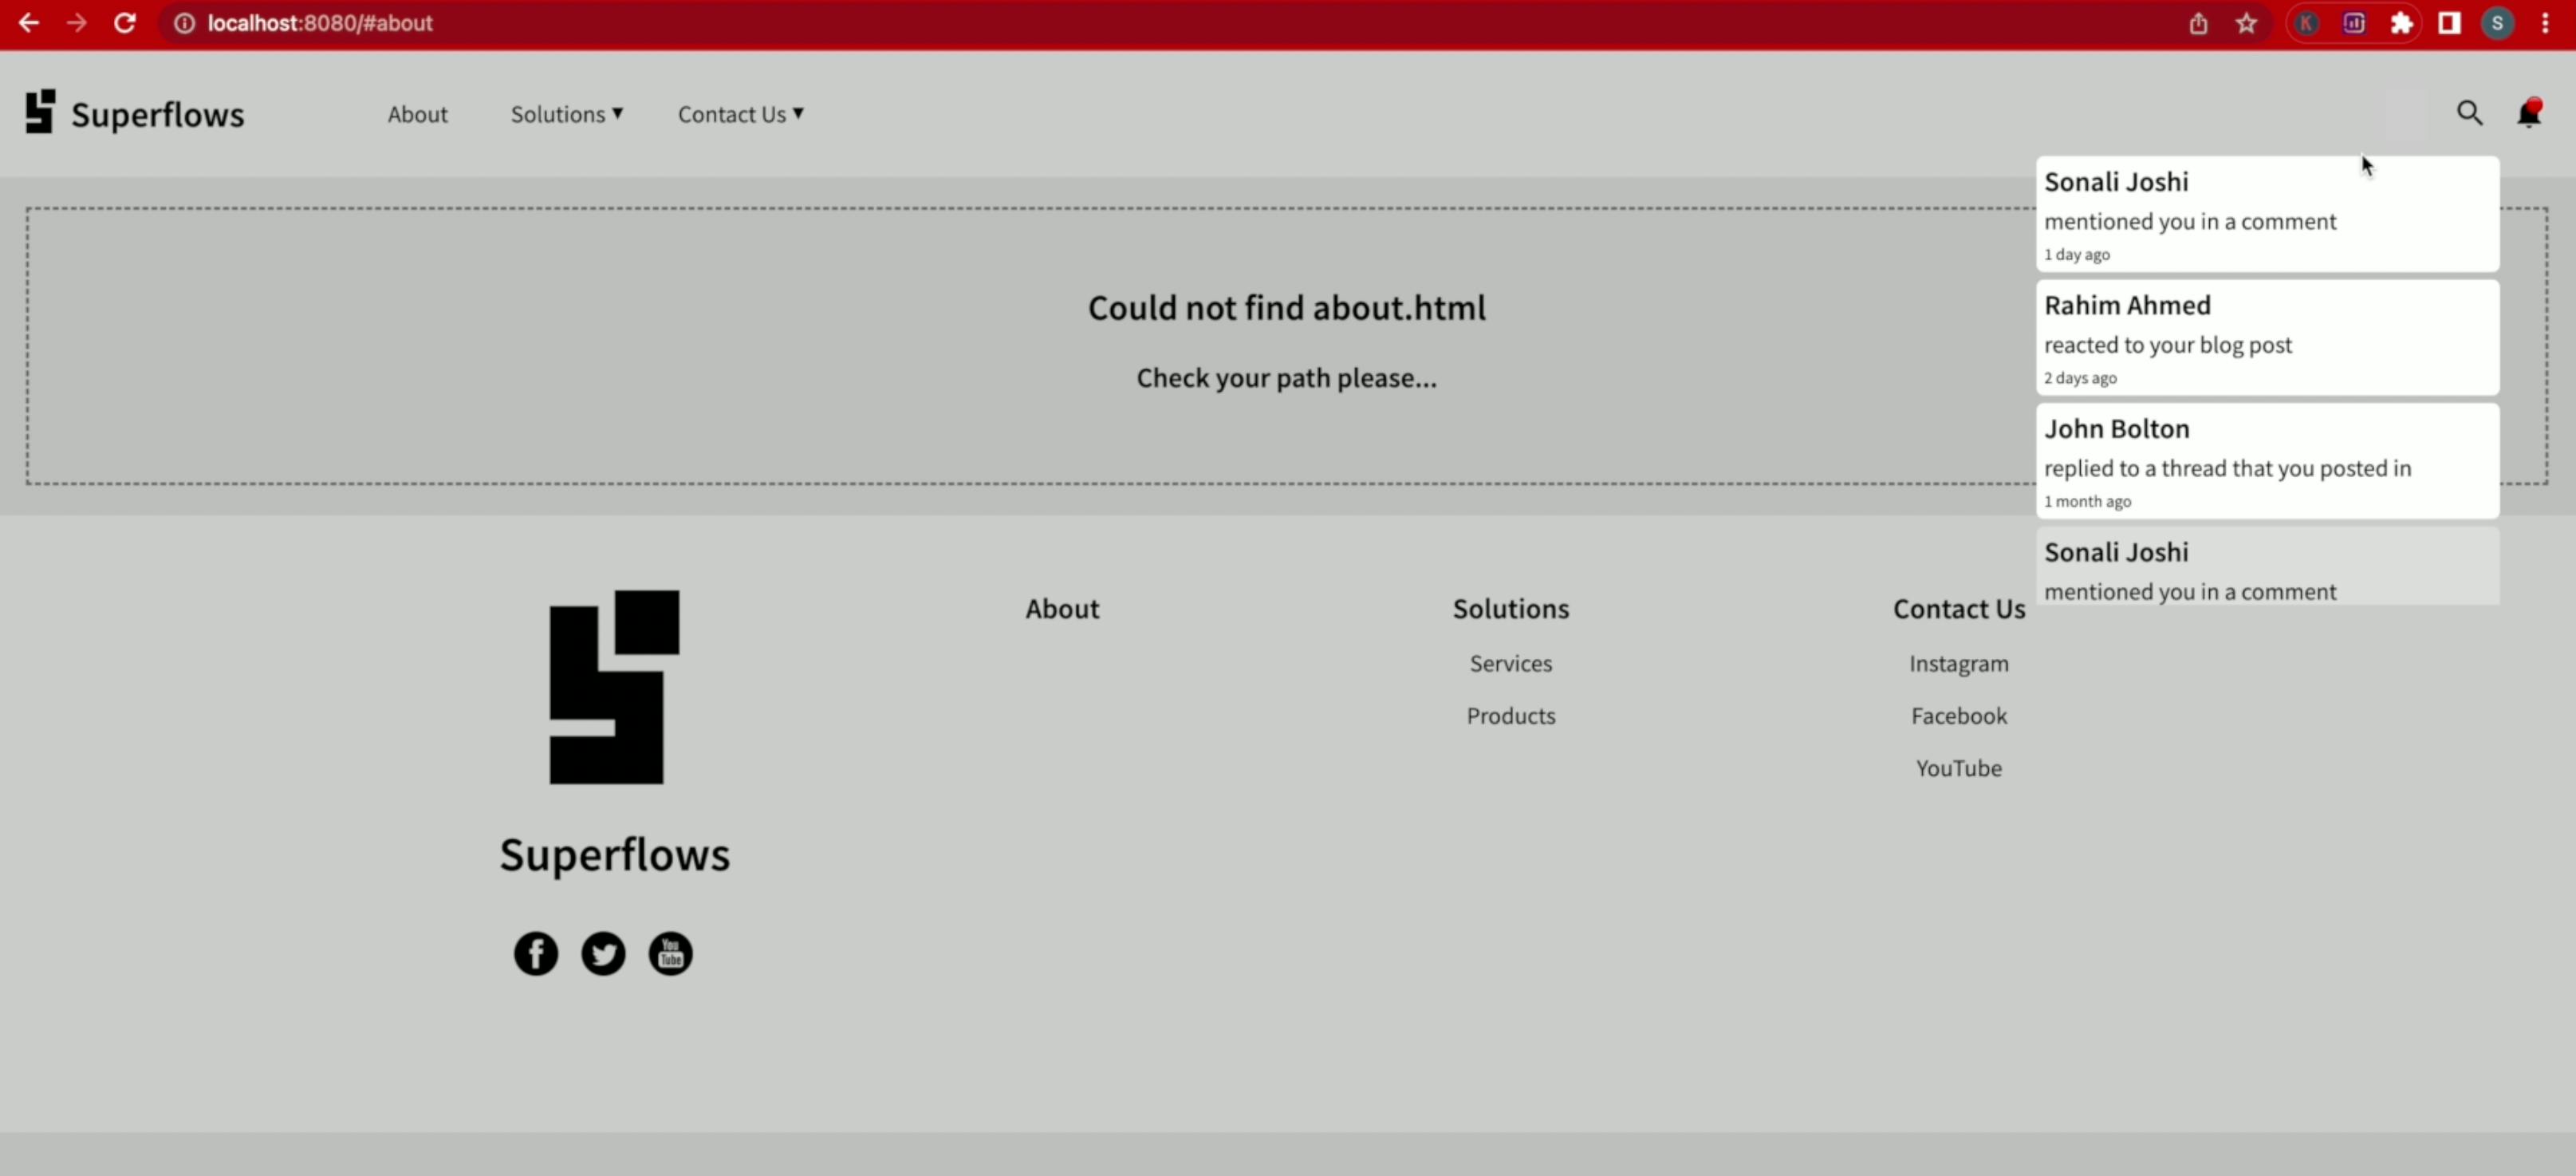
🔔 Step 7 - Setup Notifications
7.1 HTML Configuration
The notifications section has three parts - (1) Unread notifications, (2) Read notifications and (3) View-all link. Configuration is shown below:
<body>
    <sf-nav>

        <!-- Set the notifications -->
        <ul slot="unreadNotifications">
            <li><a href="#notification/1"><h3>Sonali Joshi</h3><p>mentioned you in a comment</p><div>1 day ago</div></a></li>
            <li><a href="#notification/2"><h3>Rahim Ahmed</h3><p>reacted to your blog post</p><div>2 days ago</div></a></li>
            <li><a href="#notification/3"><h3>John Bolton</h3><p>replied to a thread that you posted in</p><div>1 month ago</div></a></li>
        </ul>
        <ul slot="readNotifications">
            <li><a href="#notification/4"><h3>Sonali Joshi</h3><p>mentioned you in a comment</p><div>1 day ago</div></a></li>
            <li><a href="#notification/5"><h3>Rahim Ahmed</h3><p>reacted to your blog post</p><div>2 days ago</div></a></li>
            <li><a href="#notification/6"><h3>John Bolton</h3><p>replied to a thread that you posted in</p><div>1 month ago</div></a></li>
        </ul>

    </sf-nav>
</body>
💾 ↺ Save dist/index.html, and reload the browser.
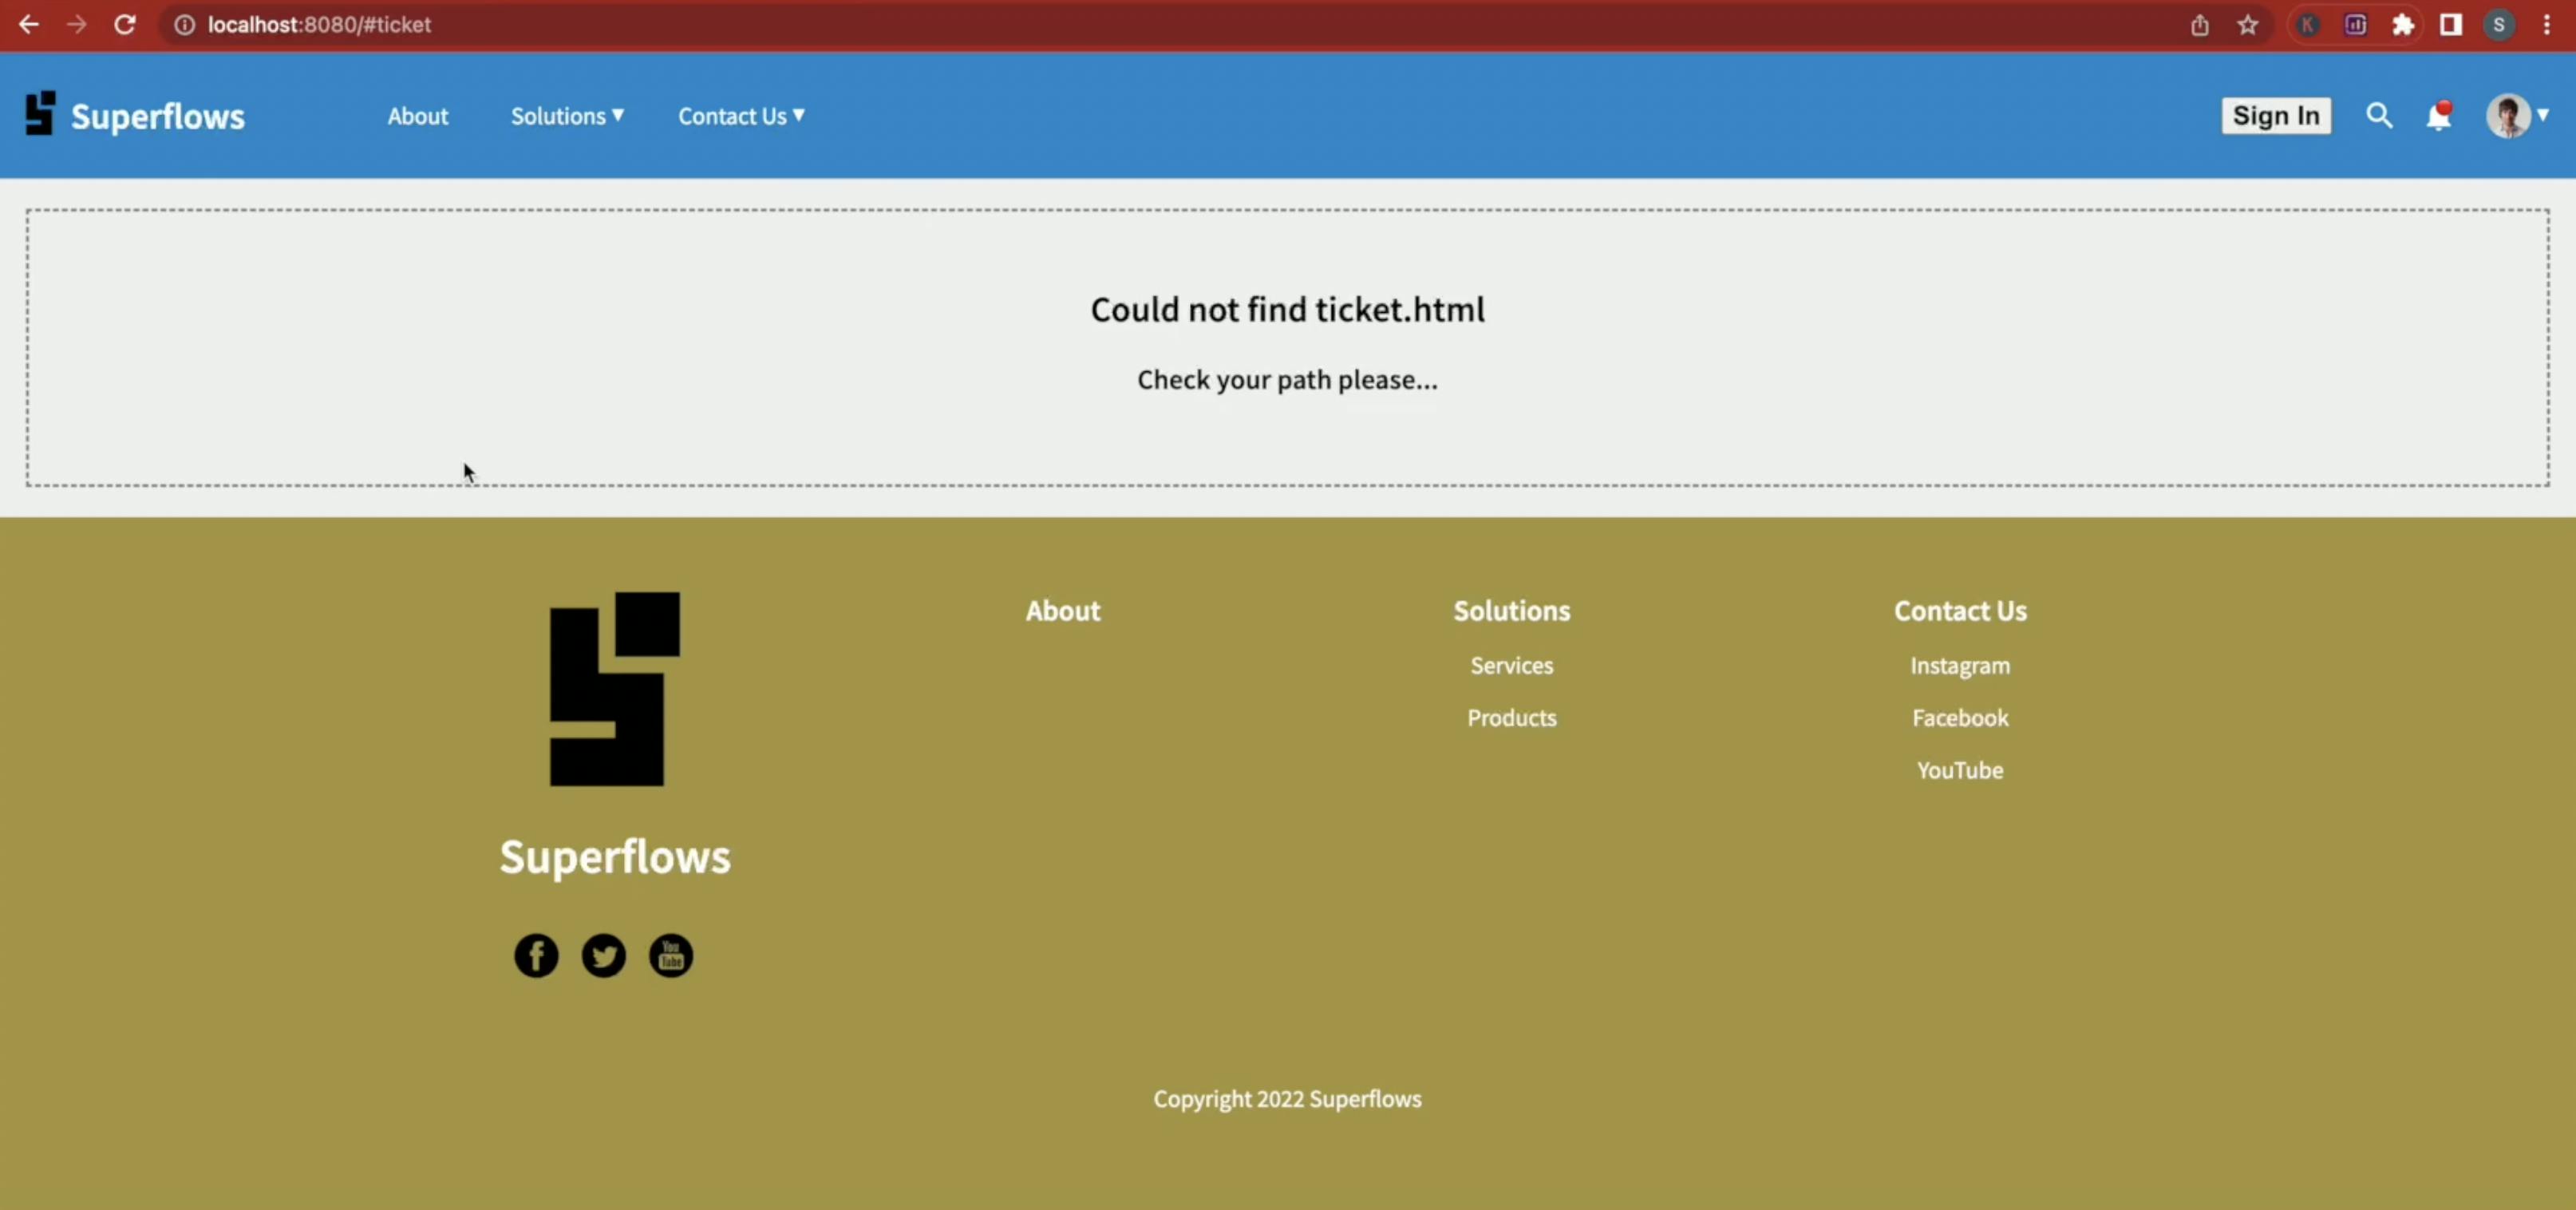
If you try clicking on any notification, you will see the file not found message. This is fine because we haven't yet created dist/notification.html. Shall we do that now?
7.2 Create dist/notification.html
Create a new file dist/notification.html. Copy and paste the HTML code given below into it.
<div class="cContainer">
    <h1>Notification Page</h1>
    <h2></h2>
    <p>Lorem Ipsum is simply dummy text of the printing and typesetting industry. Lorem Ipsum has been the industry's standard dummy text ever since the 1500s, when an unknown printer took a galley of type and scrambled it to make a type specimen book. It has survived not only five centuries, but also the leap into electronic typesetting, remaining essentially unchanged. It was popularised in the 1960s with the release of Letraset sheets containing Lorem Ipsum passages, and more recently with desktop publishing software like Aldus PageMaker including versions of Lorem Ipsum.</p>
</div>
<script>
    document.getElementsByClassName('cContainer')[0].children[1].innerHTML = 'Arguments: ' + JSON.stringify(getCurrentArgs())
</script>
💾 ↺ Save dist/notification.html, and reload the browser.
Go ahead, and try clicking on any of the notifications. You will observe the following:
The notification page will render.
The URL parameters or arguments such as #notification/1 or #notification/2 will be passed down to the notification component and rendered as well.
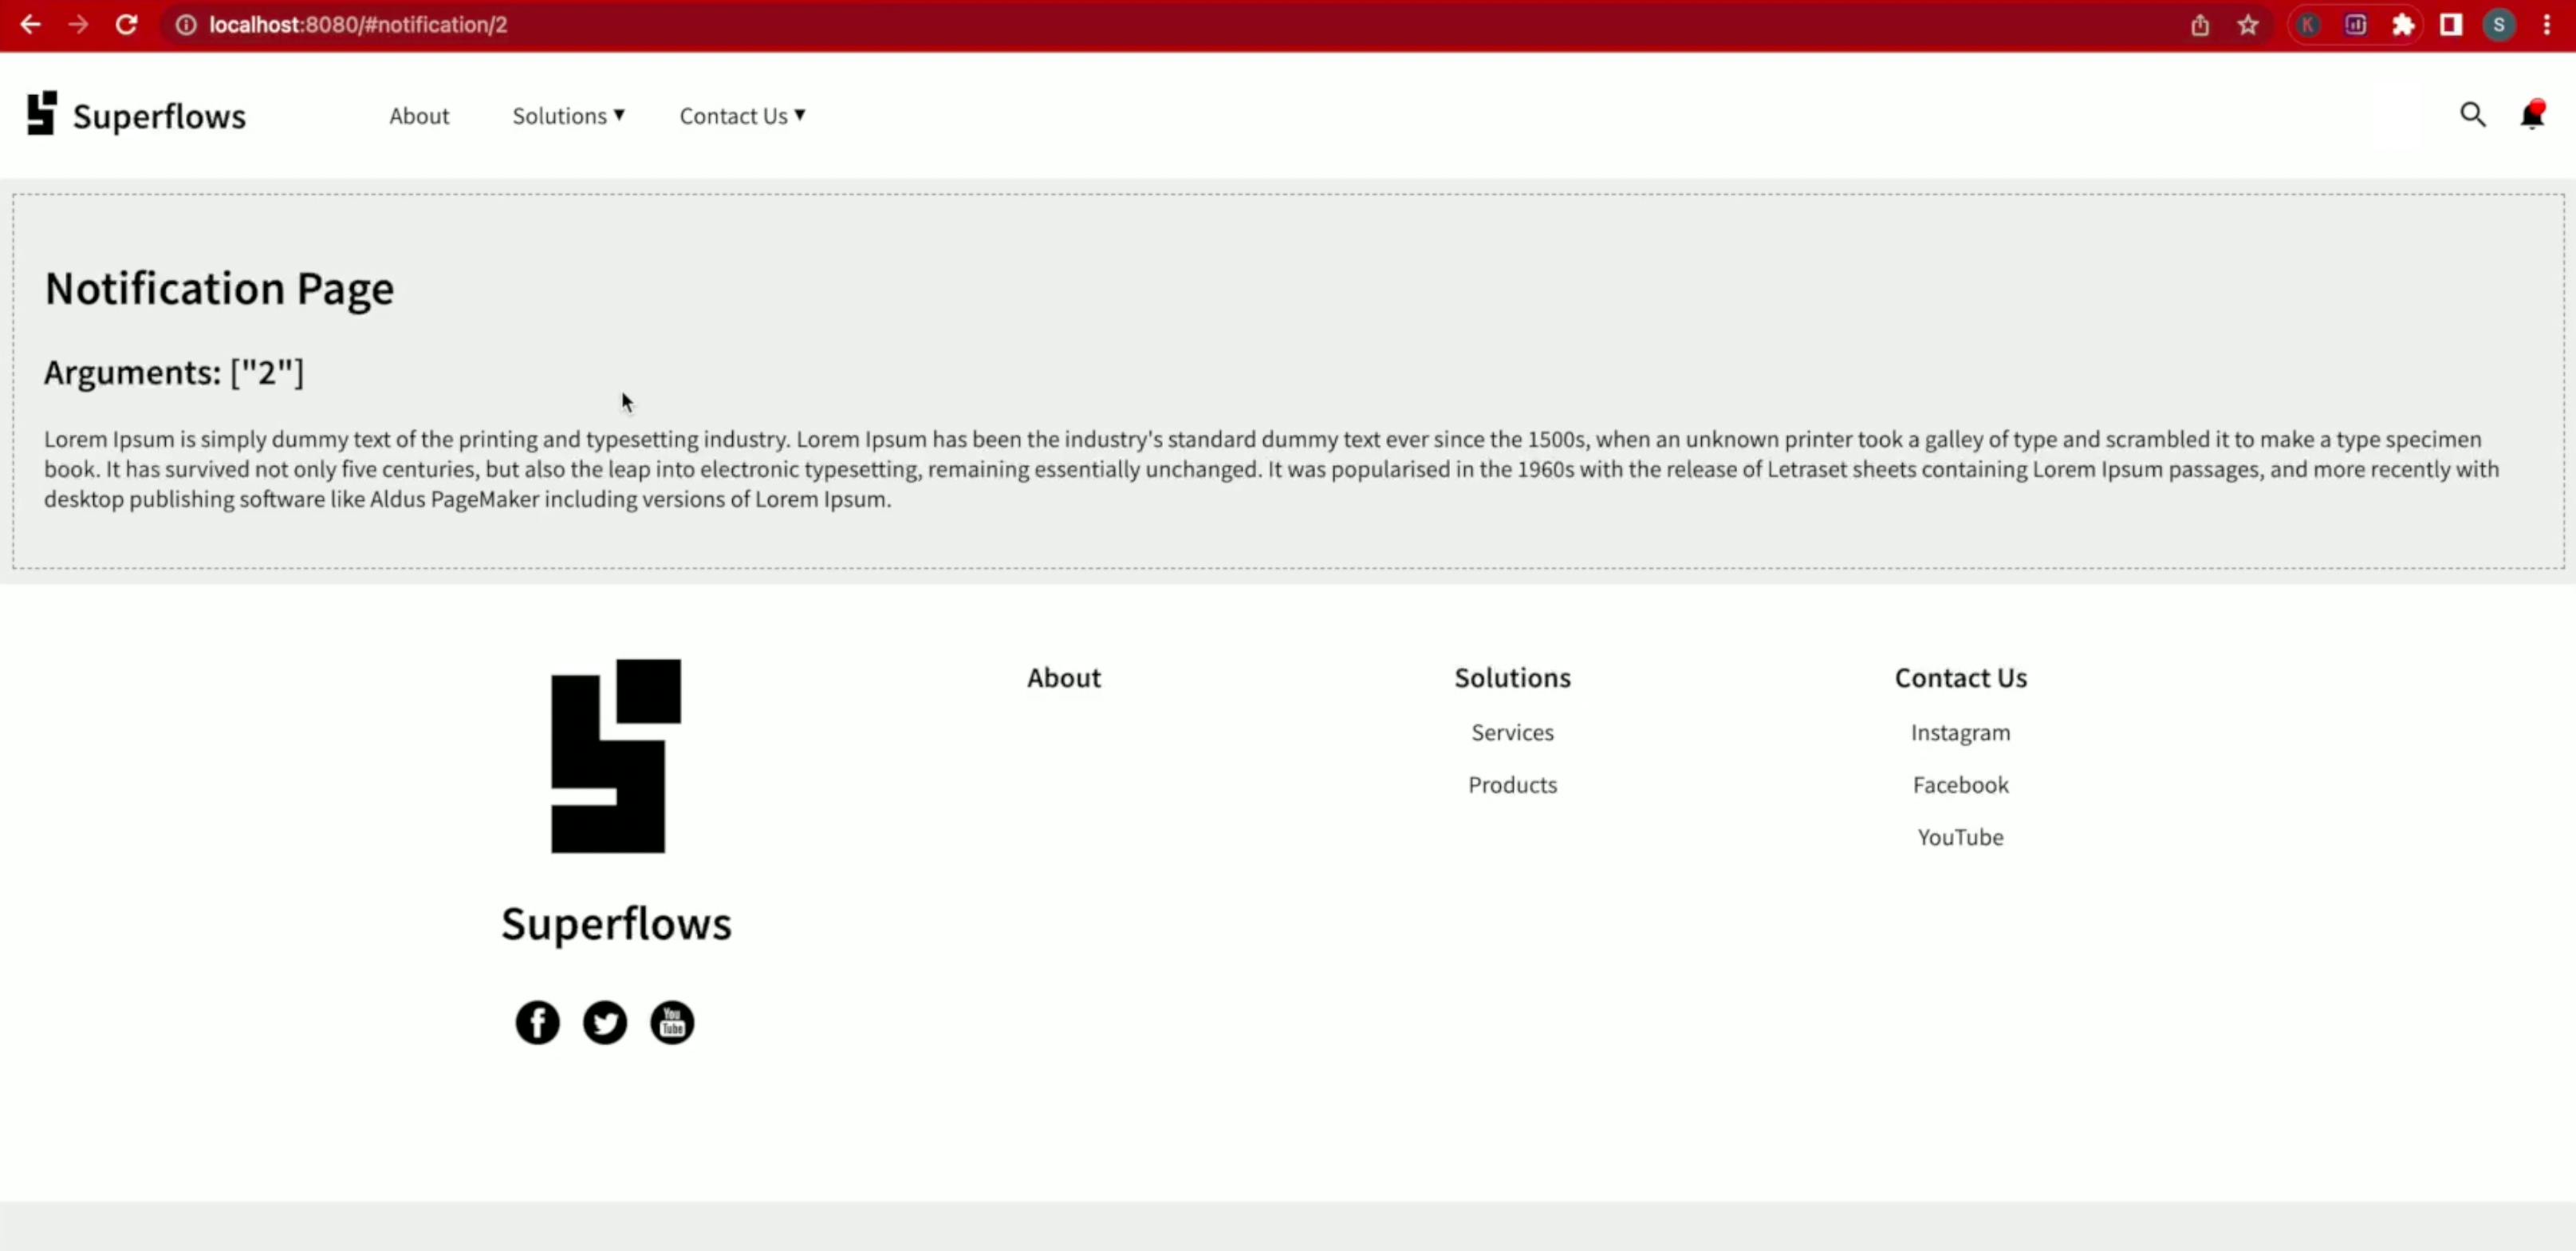
Quick Note
This is essentially routing at work where the parameters from the browser address bar are fed to the notification component.
© Step 8 - Copyright Notice
Copyright notice can be configured in the footer as follows:
<body>
    <sf-nav>

        <!-- Copyright notice -->
        <p slot="copyright">Copyright 2022 Superflows</p>

    </sf-nav>
</body>
💾 ↺ Save dist/notification.html, and reload the browser.
The copyright notice will be displayed in the footer.
🕺 Step 9 - Setup Call To Action Button
Most navbars have a call to action button. In SfNav, it can be configured as follows:
<a slot="cta" href="#login">Sign In</a>
💾 ↺ Save dist/notification.html, and reload the browser.
The call to action button will be displayed in the header.
👨👩 Step 10 - Setup User Profile
The user profile section contains two parts - (1) The profile picture toggle and (2) The profile menu. Both parts can be configured as follows:
<body>
    <sf-nav>

        <!-- Profile picture -->
        <img alt="profile" slot="profilePicture" src="https://preview.keenthemes.com/metronic-v4/theme/assets/pages/media/profile/profile_user.jpg" />

        <!-- Set the profile menu -->
        <ul slot="profileMenu">
            <li><a href="#settings">My Profile</a></li>
            <li>
                <a href="javascript:void(0);">Settings</a>
                <ul>
                    <li><a href="#settings_data">Data & Privacy</a></li>
                    <li><a href="#settings_notifications">Notifications</a></li>
                </ul>
            </li>
            <li>
                <a href="javascript:void(0);">Support</a>
                <ul>
                    <li><a href="#ticket">Create Ticket</a></li>
                    <li><a href="#chat">Chat With Us</a></li>
                </ul>
            </li>
            <li><a href="#signout">Sign Out</a></li>
        </ul>

    </sf-nav>
</body>
💾 ↺ Save dist/notification.html, and reload the browser.

🔴🟢🔵 Step 11 - Theme The User Interface
Let us now modify the colours, to make the UI more attractive and customizable to your needs. For the sake of this tutorial, we have used some colours, but you are free to choose any colours.
Add the below-given styles to the style block of dist/index.html.
<style>

    sf-nav {
        --nav-background-color: rgb(4, 135, 205);
        --nav-color: #fff;
        --notif-background-color: rgb(4, 135, 205);
        --notif-color: #fff;
        --menu-background-color: rgb(49, 161, 222);
        --menu-color: #fff;
        --footer-background-color: rgb(167, 147, 60);
        --footer-color: #fff;
    }

</style>
💾 ↺ Save dist/notification.html, and reload the browser.
Conclusion
That is it then! I have shown you how to create a single-page web application with a modular code architecture using SfNav, a web component provided by Superflows. If you have any questions, do not hesitate to drop a comment below and I would be happy to answer.
Please find a video of the same tutorial below: