

How to Handle Non-registered, Registered and Subscribed User States in a React Navbar in 11 Easy Steps
A step-by-step guide that simplifies setting up a navigation bar in React that handles user login and subscription states.


Introduction
Users start as non-registered users, when they visit our web application for the first time. If they get interested in the offering, they sign up and become registered users. If they decide to make a purchase or subscribe to the offering, they make a payment and then become subscribers. This user journey is typically the same for most web apps.
Navigation bar, is a key component of any web app. It helps users browse through the web app effortlessly. It also helps the users understand the status of their subscription or membership, next action to be performed, etc.
Hence the navigation bar should be equipped in presenting this information to the users as and when required. This article, in 11 simple steps, demonstrates how to setup a navigation bar in a React app that supports the non-registered, registered and subscribed user states.
Reference Code
Navbar for a non-registered user
Step 1 - Install the Superflows library
We utilize the navigation bar library developed by Superflows for this task. Let us start by integrating it using npm.
npm install --save react-sf-themes
npm install --save react-sf-building-blocks
Step 2 - Import the navigation bar component
Import the Superflows navbar component as shown
import { SfNav } from 'react-sf-building-blocks';
Step 3 - Setup the default navbar
Use the SfNav component in the return function as shown below. It will display the default navbar.
return (
  <div>
    <SfNav />
      {/* Your code */}
    </div>
);
The default navbar will render as follows:


Step 4 - Add your branding information
You can set your brand name as follows
return (
  <div>
    <SfNav brand="Your Brand"/>
      {/* Your code */}
    </div>
);


You can set your brand logo as follows
return (
  <div>
    <SfNav brandLogo="<logo_url>"/>
      {/* Your code */}
    </div>
);


Step 5 - Add your main menu
You can set the main menu by passing a json object to the menu prop. As shown below:
return (
  <div>
    <SfNav
      brand="Your Brand"
      menu={[{caption: "Team", link: "team"}, [{caption: "Products", link: "products"}, {caption: "Video", link: "video"}, {caption: "Audio", link: "audio"}], [{caption: "Contact", link: "contact"}, {caption: 'Instagram', link: "instagram"}]]} />
      {/* Your code */}
    </div>
);


Step 6 - Subscribe to event callbacks
The navigation bar provides three callbacks. One, after the user types something in the search input and presses enter. Two, after the user presses the sign in button. Three, after user clicks on a menu. As shown below:
return (
  <div>
    <SfNav
      brand="Your Brand"
      menu={[{caption: "Team", link: "team"}, [{caption: "Products", link: "products"}, {caption: "Video", link: "video"}, {caption: "Audio", link: "audio"}], [{caption: "Contact", link: "contact"}, {caption: 'Instagram', link: "instagram"}]]}
      onMenuClicked={(value) => {alert(value)}}
      onSearchPressed={(value) => {alert(value)}}
      onSignInPressed={() => {alert('Sign in pressed!')}}  />
      {/* Your code */}
    </div>
);
At this stage, the navbar for the non-registered user is ready.
Navbar for a registered user
Step 7 - Enable the profile section & set the profile picture
To customize the navbar for a registered user, user profile information needs to be displayed. Enabling the profile section and set the profile image, as shown below:
return (
  <div>
    <SfNav
     brand="Your Brand"
      menu={[{caption: "Team", link: "team"}, [{caption: "Products", link: "products"}, {caption: "Video", link: "video"}, {caption: "Audio", link: "audio"}], [{caption: "Contact", link: "contact"}, {caption: 'Instagram', link: "instagram"}]]}
      onMenuClicked={(value) => {alert(value)}}
      onSearchPressed={(value) => {alert(value)}}
      onSignInPressed={() => {alert('Sign in pressed!')}}
      showProfile={true}
profilePicture='https://i.pinimg.com/736x/7f/79/6d/7f796d57218d9cd81a92d9e6e8e51ce4--free-avatars-online-profile.jpg'
                />
      {/* Your code */}
    </div>
);


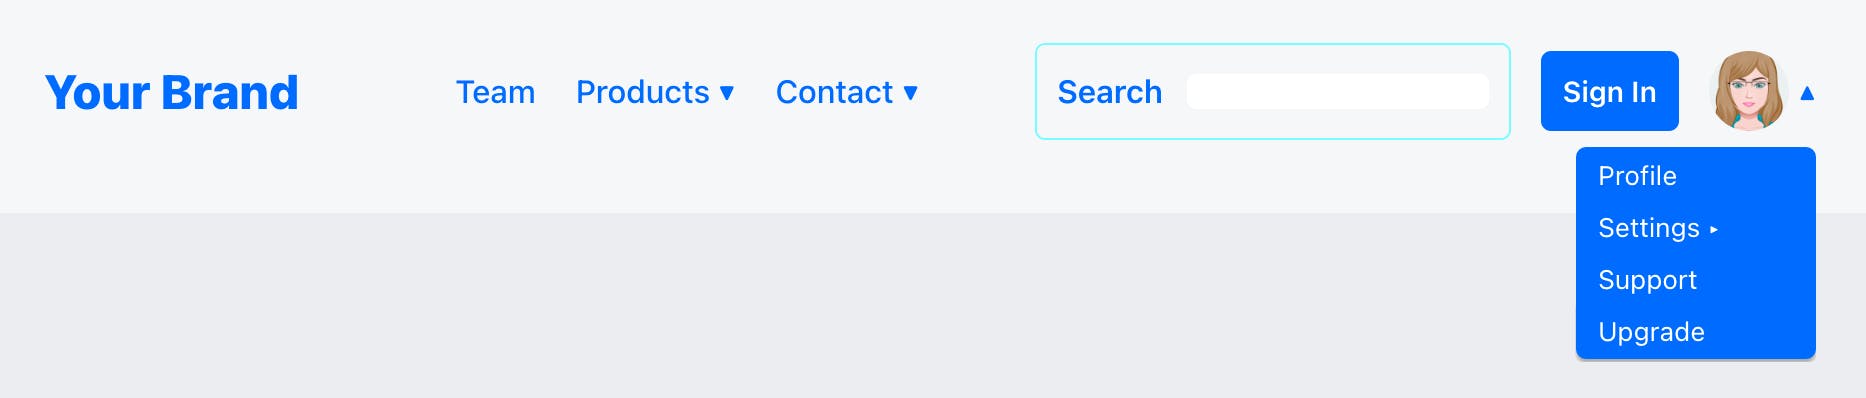
Step 8 - Add the profile menu for the registered user
The registered user needs to be given a separate menu, a more personalised menu, in addition to the main menu. Profile menu can also be set by passing a JSON object. As shown below:
return (
  <div>
    <SfNav
      brand="Your Brand"
      menu={[{caption: "Team", link: "team"}, [{caption: "Products", link: "products"}, {caption: "Video", link: "video"}, {caption: "Audio", link: "audio"}], [{caption: "Contact", link: "contact"}, {caption: 'Instagram', link: "instagram"}]]}
      onMenuClicked={(value) => {alert(value)}}
      onSearchPressed={(value) => {alert(value)}}
      onSignInPressed={() => {alert('Sign in pressed!')}}
      showProfile={true}
profilePicture='https://i.pinimg.com/736x/7f/79/6d/7f796d57218d9cd81a92d9e6e8e51ce4--free-avatars-online-profile.jpg'
      profileMenu={[{caption: "Profile", link: "profile"}, [{caption: "Settings", link: "support"}, {caption: "Notifications", link: "notifications"}, {caption: "Privacy", link: "privacy"}], {caption: "Support", link: "support"}, {caption: 'Upgrade', link: "upgrade"}]}
                />
      {/* Your code */}
    </div>
);

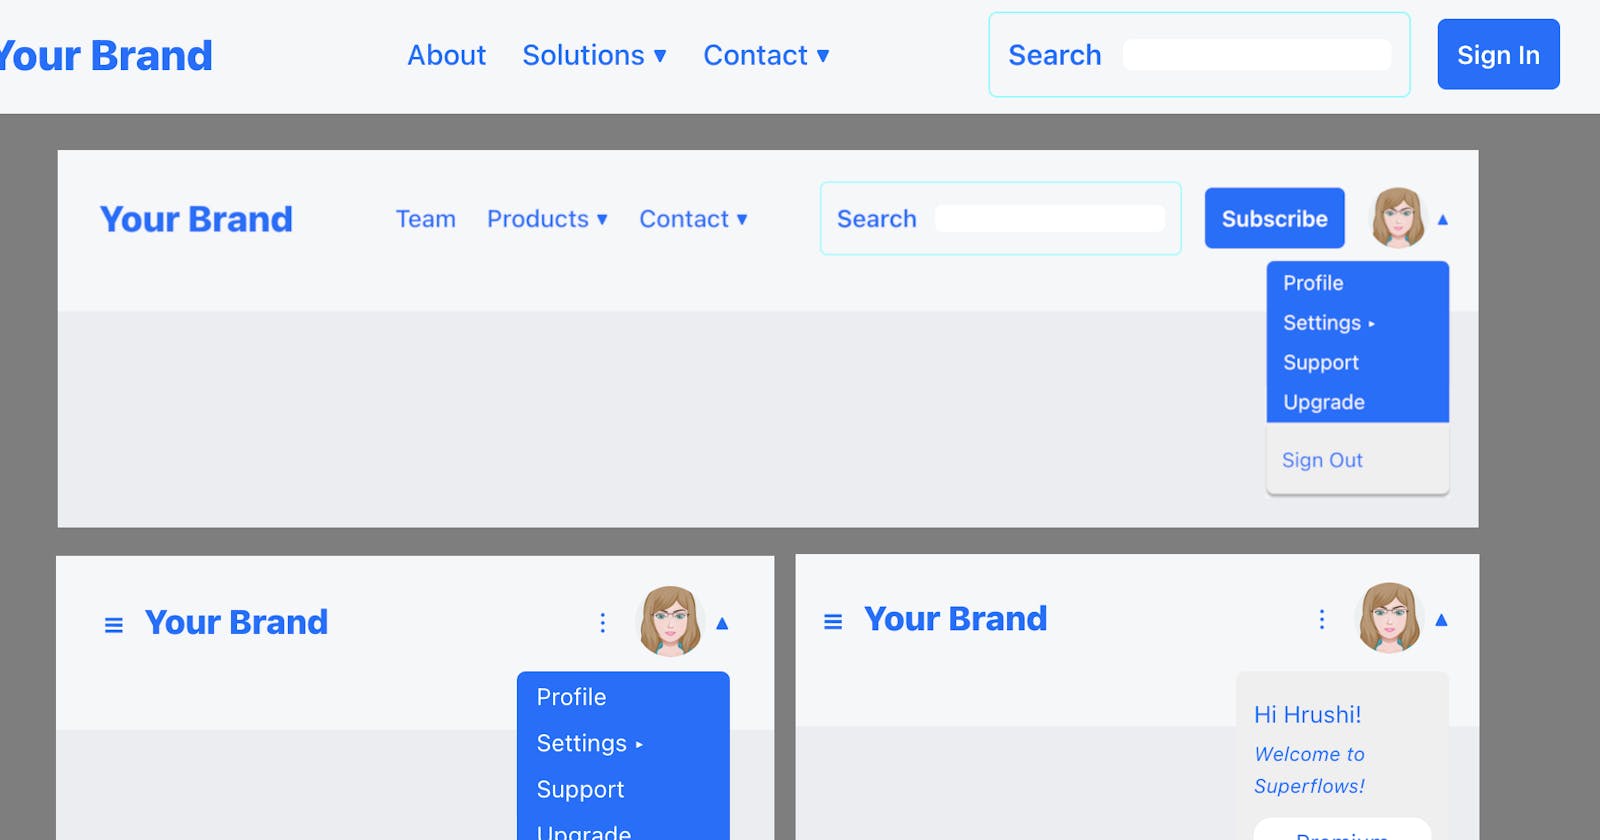
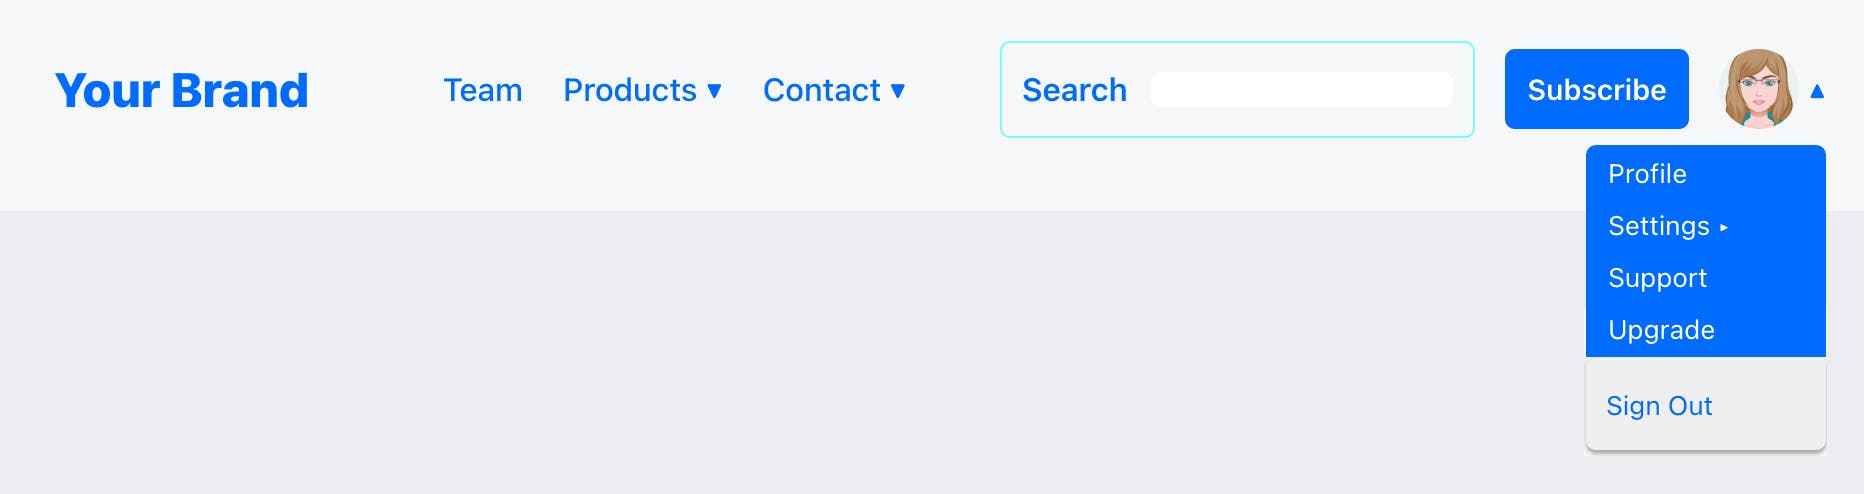
Step 9 - Add a logout button and change sign in button to subscribe button
In most use-cases, sign in button may not be required for a registered user. A sign out button through, is definitely required. The navigation bar provides a container, called as Profile Component, which allows injection of custom components, below the profile menu. We will create a custom logout button and inject there, as shown below. The sign in button can also be reused as a subscribe button.
return (
  <div>
    <SfNav
      brand="Your Brand"
      menu={[{caption: "Team", link: "team"}, [{caption: "Products", link: "products"}, {caption: "Video", link: "video"}, {caption: "Audio", link: "audio"}], [{caption: "Contact", link: "contact"}, {caption: 'Instagram', link: "instagram"}]]}
      onMenuClicked={(value) => {alert(value)}}
      onSearchPressed={(value) => {alert(value)}}
      onSignInPressed={() => {alert('Sign in pressed!')}}
      showProfile={true}
      signInCaption="Subscribe"
profilePicture='https://i.pinimg.com/736x/7f/79/6d/7f796d57218d9cd81a92d9e6e8e51ce4--free-avatars-online-profile.jpg'
      profileMenu={[{caption: "Profile", link: "profile"}, [{caption: "Settings", link: "support"}, {caption: "Notifications", link: "notifications"}, {caption: "Privacy", link: "privacy"}], {caption: "Support", link: "support"}, {caption: 'Upgrade', link: "upgrade"}]}
      profileComponent={<div style={{cursor: 'pointer', width: '100%', paddingTop: '10px', paddingBottom: '10px', paddingLeft: '10px', paddingRight: '10px'}} onClick={() => {alert('Sign Out Clicked!')}}><small>Sign Out</small></div>}
                />
      {/* Your code */}
    </div>
);

At this stage, the navbar for the registered user is ready.
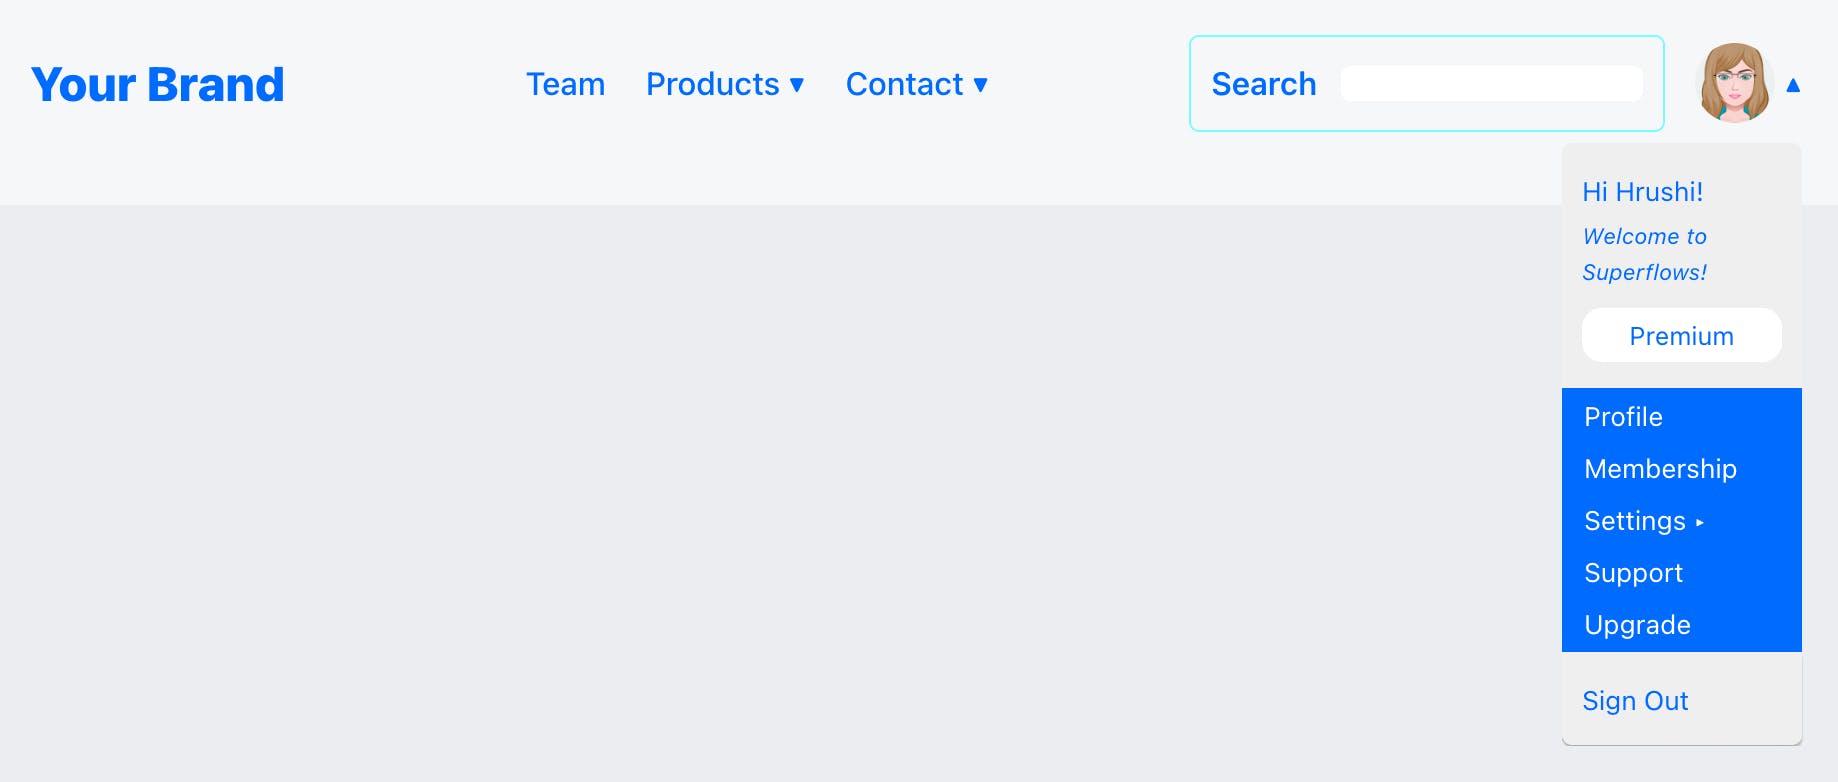
Navbar for a subscribed user
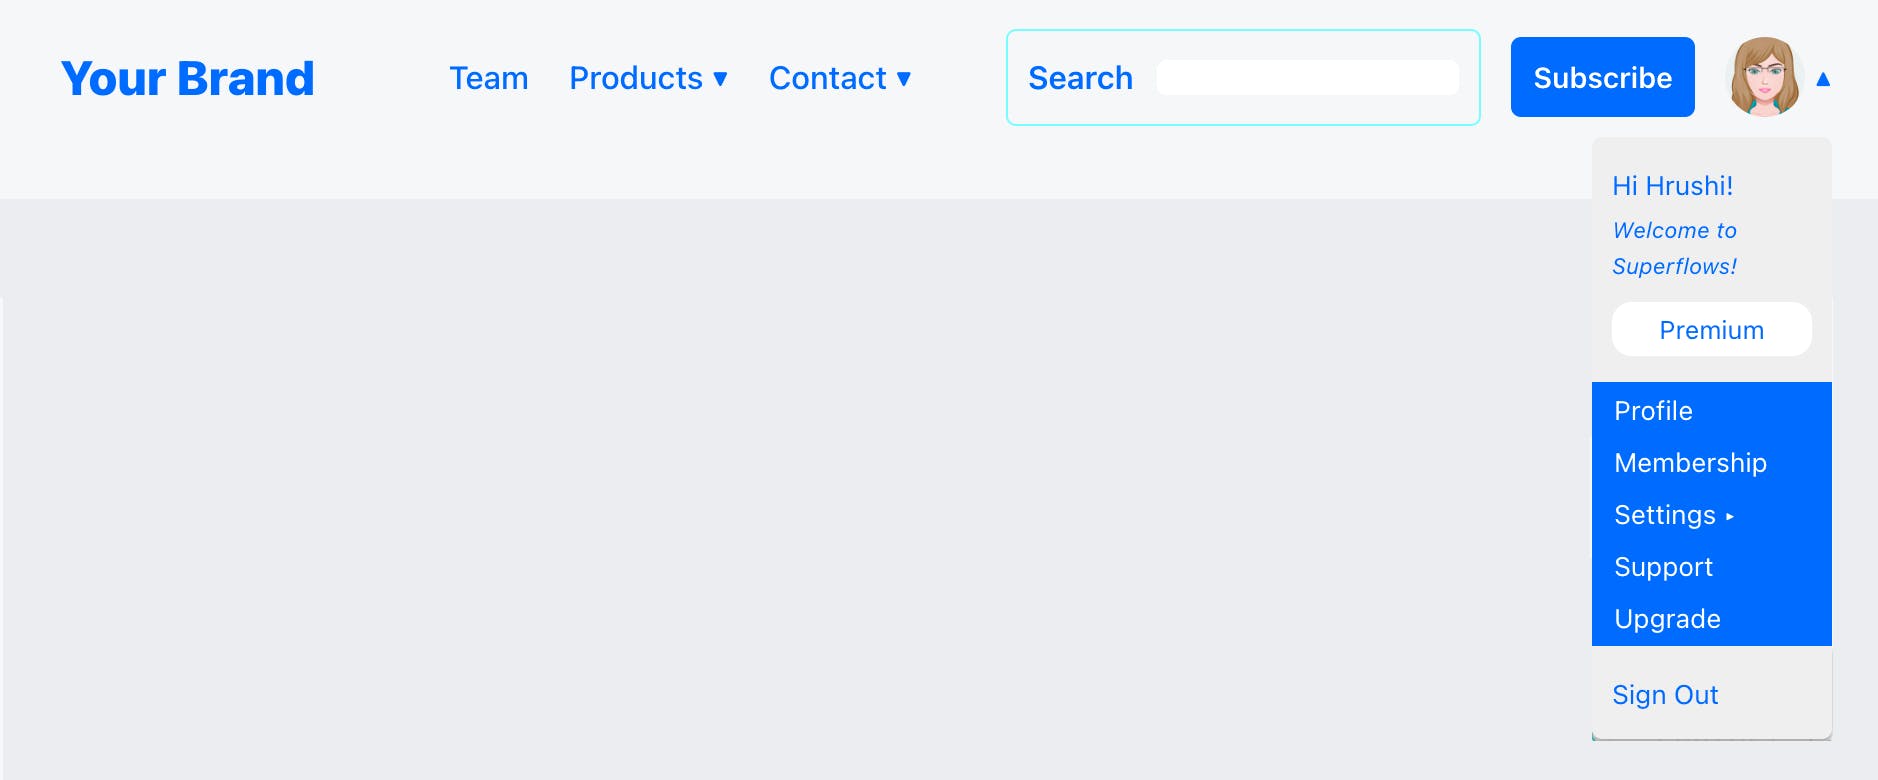
Step 10 - Set the profile menu and the subscription info badge for the subscribed user
Profile menu for the subscribed user is probably different from the profile menu for the registered user. Set it according to your requirements. The navbar also supports injection of a custom component, in a preamble container, just before the profile menu. It can be used to showcase the subscriber information. I am showing an example below.
return (
  <div>
    <SfNav
      brand="Your Brand"
      menu={[{caption: "Team", link: "team"}, [{caption: "Products", link: "products"}, {caption: "Video", link: "video"}, {caption: "Audio", link: "audio"}], [{caption: "Contact", link: "contact"}, {caption: 'Instagram', link: "instagram"}]]}
      onMenuClicked={(value) => {alert(value)}}
      onSearchPressed={(value) => {alert(value)}}
      onSignInPressed={() => {alert('Sign in pressed!')}}
      showProfile={true}
      signInCaption="Subscribe"
profilePicture='https://i.pinimg.com/736x/7f/79/6d/7f796d57218d9cd81a92d9e6e8e51ce4--free-avatars-online-profile.jpg'
      profileMenu={[{caption: "Profile", link: "profile"}, {caption: "Membership", link: "membership"}, [{caption: "Settings", link: "support"}, {caption: "Notifications", link: "notifications"}, {caption: "Privacy", link: "privacy"}], {caption: "Support", link: "support"}, {caption: 'Upgrade', link: "upgrade"}]}
      profileComponent={<div style={{cursor: 'pointer', width: '100%', paddingTop: '10px', paddingBottom: '10px', paddingLeft: '10px', paddingRight: '10px'}} onClick={() => {alert('Sign Out Clicked!')}}><small>Sign Out</small></div>}
       profilePreamble={<div style={{width: '100%', paddingTop: '10px', paddingBottom: '10px', paddingLeft: '10px', paddingRight: '10px'}}><small>Hi Hrushi!</small><br /><div style={{lineHeight: '100%'}}><small><small><i>Welcome to Superflows!</i></small></small></div><div style={{display: 'flex', justifyContent: 'center', alignItems: 'center'}}><div style={{marginTop: '10px', marginBottom: '5px', width: '100%', textAlign: 'center',fontSize: '80%', paddingLeft: '5px', paddingRight: '5px', paddingTop: '3px', paddingBottom: '3px', backgroundColor: 'white', borderRadius: '10px'}}>Premium</div></div></div>
                    }
                />
      {/* Your code */}
    </div>
);

Step 11 - Hide the sign in / subscribe button
Sign in / subscribe button may not be required for a user who is already subscribed. Go ahead, hide it. This is the last step of the tutorial.
return (
  <div>
    <SfNav
      brand="Your Brand"
      menu={[{caption: "Team", link: "team"}, [{caption: "Products", link: "products"}, {caption: "Video", link: "video"}, {caption: "Audio", link: "audio"}], [{caption: "Contact", link: "contact"}, {caption: 'Instagram', link: "instagram"}]]}
      onMenuClicked={(value) => {alert(value)}}
      onSearchPressed={(value) => {alert(value)}}
      onSignInPressed={() => {alert('Sign in pressed!')}}
      showProfile={true}
      showSignIn={false}
profilePicture='https://i.pinimg.com/736x/7f/79/6d/7f796d57218d9cd81a92d9e6e8e51ce4--free-avatars-online-profile.jpg'
      profileMenu={[{caption: "Profile", link: "profile"}, {caption: "Membership", link: "membership"}, [{caption: "Settings", link: "support"}, {caption: "Notifications", link: "notifications"}, {caption: "Privacy", link: "privacy"}], {caption: "Support", link: "support"}, {caption: 'Upgrade', link: "upgrade"}]}
      profileComponent={<div style={{cursor: 'pointer', width: '100%', paddingTop: '10px', paddingBottom: '10px', paddingLeft: '10px', paddingRight: '10px'}} onClick={() => {alert('Sign Out Clicked!')}}><small>Sign Out</small></div>}
       profilePreamble={<div style={{width: '100%', paddingTop: '10px', paddingBottom: '10px', paddingLeft: '10px', paddingRight: '10px'}}><small>Hi Hrushi!</small><br /><div style={{lineHeight: '100%'}}><small><small><i>Welcome to Superflows!</i></small></small></div><div style={{display: 'flex', justifyContent: 'center', alignItems: 'center'}}><div style={{marginTop: '10px', marginBottom: '5px', width: '100%', textAlign: 'center',fontSize: '80%', paddingLeft: '5px', paddingRight: '5px', paddingTop: '3px', paddingBottom: '3px', backgroundColor: 'white', borderRadius: '10px'}}>Premium</div></div></div>
                    }
                />
      {/* Your code */}
    </div>
);
Further reading
Please visit the Superflows documentation, for further reading.
Conclusion
This article is a step by step tutorial on developing a navigation bar that handles the different user states of being not-registered, then registered and finally subscribed.
About the author
Hrushi M is an entrepreneur by profession and software engineer by training. He has the experience of bootstrapping a software consulting company and leading as its CEO for more than a decade. He is currently the developer and maintainer of superflows.dev, a framework for developing cloud-based server-less applications.